https://www.fuzzyfabric.com/blogs/news.atomFuzzyFabric - Wholesale Ribbons, Tulle Fabric, Wreath Deco Mesh Supplies - News2023-05-10T09:33:30-07:00FuzzyFabric - Wholesale Ribbons, Tulle Fabric, Wreath Deco Mesh Supplieshttps://www.fuzzyfabric.com/blogs/news/how-much-tulle-does-it-take-to-make-a-tutu2023-05-10T09:33:30-07:002023-05-10T09:33:30-07:00How Much Tulle Does It Take to Make a Tutu?Muralidharan Ramani
Types of Tulle
We suggests usingpolyester tullefor the bounciest and fluffiest tutus, whilenylon tullemakes a better choice for a less voluminous skirt. To determine the quality of your tulle, scrunch it and then press it flat with your hands. Good tulle will release the wrinkles fairly easily. If it stays wrinkled, the tulle is likely cheap and will not hold up well to the wear and tear that your costume may be subject to.
How Much Tulle to Use
In general, Melissa says, you’ll use between 100 and 600 yards of tulle depending on the waist size and desired length. Keep in mind that exact measurements are best when possible, but below are Melissa’s suggestions for sizing:
Elastic Waistband Measurements:
Size
Waistband Measurement
0-3 months
14”
3-6 months
15”
6-12 months
16”
12-18 months
17”
2T
18”
3T
18.5”
4T
19”
5T
19.5”
Note: For larger sizes, use an exact measurement and subtract 3 inches to allow for stretching.
Tulle Lengths
Cut your tulle twice as long as the desired length of your tutu, referring to the size chart below. 12” tutus work for ages 10 and up, but use exact measurements if you’d like a longer tutu.
Size
Tutu Length
Tulle Length
0-3 months
5”
10”
3-6 months
6”
12”
6-12 months
7”
14”
12-18 months
7.5”
15”
2T
8”
19”
3T
10”
20”
4T
11”
22”
5T
12”
24”
]]>
https://www.fuzzyfabric.com/blogs/news/diy-deco-mesh-flowers2023-05-10T09:10:22-07:002023-05-10T09:11:19-07:00DIY Deco Mesh FlowersMuralidharan Ramani
Have you ever wanted to add a splash of color to your event or craft with a truly handmade touch? Why not bring life and color to any space by making DIY Deco Mesh Flowers? Whether you’re a seasoned crafter or just starting out, you’ll love the simplicity and beauty of creating your own deco mesh flowers. With our detailed instructions and helpful tips, you’ll be able to make stunning floral arrangements in no time. Read on to learn how!
1.) First, prep the base of your flower. Using your ruler and pencil, draw straight lines (from corner to corner and side to side) along one side of your cardboard square. When finished, use the point of your pencil to create small holes along those lines. Make sure your holes are evenly spaced. Set aside when finished.
2.) Next, begin to create your rose petals and leaves by using strips of deco mesh and your scissors. Simply roll your deco mesh flat and cut a 10” x 10” strip.
Note: In total, we cut 13, 10” x 10” petals from each of our hot pink deco mesh rolls and 2, 10” x 10” leaves from our moss-colored deco mesh.
3.) After your strips of deco mesh have been cut out, put one on top of the other and fold the pair into a triangle. Repeat with each of your hot pink deco mesh strips.
4.) Once your rose petals have been shaped into triangles, start creating your flower. Beginning with the center of your flower, take the middle point of your petal and thread it through the center of your cardboard base. Repeat with each of the surrounding holes.
5.) To create a blooming effect, start with the center flower petal. Carefully wrap each corner of the flower petal inward. Repeat this wrapping motion with each of the surrounding petals. When you have reached the outer edges of your flower, secure the petal ends to the cardboard base with hot glue.
6.) Finally, finish by rolling each moss-colored deco mesh strip into simple tube shapes and hot gluing them to the outer corners of your flower.
]]>
https://www.fuzzyfabric.com/blogs/news/the-different-types-of-ribbons2023-02-02T14:57:43-08:002023-02-22T12:55:13-08:00The Different Types of RibbonsMuralidharan RamaniSatin Ribbon
When you think of ribbons, the satin ribbon will be the first to come to mind. Satin ribbons are shiny and smooth, adding a real classic elegance to any project- packaging, decorating, crafting, dressmaking. We offer a large range of double face satin ribbon, where both sides of the ribbon are silky smooth rather than just a singular side. This means that your craft or packaging will look perfect from any angle, as both sides of the ribbon will have the same beautiful sheen and be smooth to touch.
Grosgrain Ribbon
Grosgrain ribbons are defined by the ribs that run across the width of the ribbon. Our grosgrain ribbons have a lovely soft, ribbed texture perfect for gift wrapping and making accessories such as hair bows. Our grosgrain ribbons are also sturdy, thick, durable, and fully washable, which makes them perfectly suited for dressmaking.
Cord Ribbon
Cord ribbons are generally thinner than usual ribbons. We offer silky, matte, skinny or chunky cord ribbons. Our French cord ribbons come in widths of 1.5mm and 2.2mm. Recently, we have also added elastic cord ribbons to our collection which can be used to make face masks.
Organza Ribbon
Organza ribbons are thin and sheer, most commonly used for floral arrangements, gift packaging, decorating, and scrapbooking. Organza ribbons add a romantic and elegant aesthetic to any craft.
]]>
https://www.fuzzyfabric.com/blogs/news/diy-craft-ribbon-decorations-with-your-family2023-02-02T14:51:06-08:002023-02-22T12:55:12-08:00DIY Craft Ribbon Decorations with your FamilyMuralidharan Ramani
If you are wondering how to make decorations using ribbons, you are at the right place! These DIY decoration ideas include a Ribbon Wreath, Wire Frame Ribbon Tree and Ribbon Snowflake/Flower Ornament, which are all simple and fun to make with family and friends.
A) Ribbon Wreath
The Ribbon Wreath is one of my most successful ribbon crafts! As the ribbon wreath was created with only cardboard as its base, it was a pleasant surprise to see how beautiful the wreath turned out at the end. No wreath wire frame? No problem!
Materials:Cardboard (30CM x 30CM), Assortment ofRibbons
1. Firstly, use a box cutter to create the cardboard wreath by cutting out a 30CM diameter circle followed by a 20CM diameter circle inside.
2. Cut varying lengths of different ribbons and start wrapping the wreath section by section. I alternated between 3 methods to make the ribbon wreath more interesting to the eyes:
a. Tying a double knot at the front.
b. Tying a bow.
c. Wrapping a section of the cardboard with wide ribbon then layering it with narrower ribbon.
3. Optional: Make fish tail cuts to each ribbon to prevent fraying and to keep the wreath lively.
4. Use a longer strip of wide, wired ribbon to create a large bow with long ends going down the middle. This adds an artistic point to the wreath!
5. Lastly, use approximately 80CM of a ribbon of your choice to tie a handle onto the wreath.
B) Ribbon Snowflake/Flower Ornament
This next DIY decoration idea is a ribbon snowflake or flower ornament. On top of the usual baubles, you can make your own ribbon ornaments to enhance your tree! This craft is very versatile as you can change the sizes and colours of the snowflake/flower according to your preferences.
Materials:50MM Red French Satin, 50MM White French Satin, 6MM White French Satin, Lighter/Candle, Hot glue gun, Stick-on pearls
1. Cut out 6 squares of 50MM x 50MM Red French Satin and 6 squares of 50MM x 50MM White French Satin.
2. Fold the square in half, down then up as shown below.
3. Cut the pointed end off to make a straight edge. Pinch the edge with scissors and hold it close to a candle or lighter's flame to heat seal the ribbon tips together.
4. Cut along the bottom edge of the petal to make it short and straight. Then, heat seal the bottom edge too.
5. The petal should look like this now! Repeat the same steps for the other squares of ribbon.
6. Using a hot glue gun, glue the edges of the 6 red petals together like so.
7. Next, glue one white petal between two red petals and repeat the process till the flower/snowflake is complete.
8. Glue on an 160MM strip of 6MM White French Satin to form the handle.
9. Additionally, I added stick-on pearls to close the gap in the center and cover any hot glue residues.
- FuzzyFabric
]]>
https://www.fuzzyfabric.com/blogs/news/mesh-christmas-wreath-ideas2022-12-02T14:24:38-08:002023-02-22T12:55:11-08:00Mesh Christmas Wreath IdeasMuralidharan Ramani Try a Staggered Traditional Style
The winter holidays are known for their lack of greenery, but your decorations don’t have to follow suit. Standard deco mesh in spring colors provides the perfect complement to the season’s cool-white blanket of snow. It’s also a great alternative or supplement to the typical red-and-green Christmas motif you see everywhere.
Start with a wreath made of evergreen boughs for a new take on a traditional look. Using a pin, binder clip or other fastener, attach the ends of two or three ribbons of mesh to the same point along the wreath. For the coolest effect, you should choose your favorite seasonal colors, but don’t be afraid to be imaginative.
Wind the firstdeco mesh ribbonaround the wreath in a spiral until you come back to the beginning. Repeat this same process with the other colors, but offset each one to create a nice layered effect. If you’re careful, you should be able to secure them with the same fastener you started from. For a more lasting result, simply replace this temporary anchor with a dab of hot glue or something else permanent.
An Alternative for Your Sweet Tooth
One cool variant of this technique makes it easy to create a candy-cane look. Just use a white wreath as a base, and add a single strip of bright red. Or pick ametallic striped deco meshthat already features the appropriate pattern. To complete the aesthetic, attach real candy canes around the wreath.
Delight the Senses With Mesh Potpourri Pockets
Of course, you don’t necessarily have to go for the traditional evergreen boughs. You can craft a modern-yet-naturalistic wreath that imbues its surroundings with the fragrances of the season and gives you complete creative freedom.
Start by making a ring-shaped frame from some flexible twigs, ivy vines, palm fronds or stiff wire. You can also buy a wire wreath form and paint it your favorite color. This base doesn’t have to be that strong or thick, since you’ll add bulk gradually, but it should be around the size of the wreath you want to create.
Next, obtain a long piece of mesh ribbon to create a closed pocket. Fold the ribbon in half along its length before sewing the two edges together. You can also use a glue gun or adhesives to create a seam, but this may not be as effective. Once you’re done, you should have a kind of mesh tube with holes at either end.
Loosely fill your tube with your favorite natural scents. For instance, you can use pine needles, cinnamon sticks, mint leaves, store-bought potpourri or whatever else really reminds you of the season. Once you’re done, seal the ends, and wrap the ribbon around your frame. Secure it with adhesives, zip ties or pipe cleaners. Build up additional layers of ribbon in the same fashion until you’ve created a wreath you feel proud of.
Explore Form and Shape by Making Frilly Ruffles
When you want to add volume to a Christmas display, creating ruffles is an easy method. Basically, you attach the end of a ribbon to a wreath frame and then bunch up a poof before affixing the next point. Make different effects by varying the amount of deco mesh you use for each ruffle, or measure lengths of mesh with exact precision to create more uniform shapes.
Try twisting each gathered section or alternating colors to change the look. To break up the space, add curled tubes of mesh at select points.
Also remember that wreaths don’t necessarily have to adhere to the typical ring shape you see so often. For instance, adding oversized ruffles or extra layers of mesh to the inner part of the wreath is a great way to create a filled circular form. Once you’ve created a filled circle, you can spruce it up with additions like flowers, mistletoe or ribbons. It’s also possible to create a cool rustic effect by adding evergreen boughs or twigs to one section of the wreath and leaving the rest a bit more minimal.
How will you make the next holiday season your own? Share your wreath ideas, tips and tricks in the comments below.
]]>
https://www.fuzzyfabric.com/blogs/news/how-to-buy-ribbon-for-every-need2022-12-02T14:07:37-08:002023-02-22T12:55:10-08:00How to Buy Ribbon for Every NeedMuralidharan Ramani
Ribbon for Wrapping Presents
Decorating gifts is probably the most popular use for ribbon. It’s a good idea to keep several types and colors on hand, including a few that are appropriate for specific holidays and themed events. Practically all ribbons are great for gift-wrapping; each type lends its own special look and feel. Raffia and paper ribbons are ideal for food–related gifts. Cloth, lace and braided cords are perfect for elegant, expensive gifts. If your ribbon-tying skills are lacking, buy pre-made adhesive bows or pull bows.
Ribbon for Hairstyles
Few things are cuter than ribbons tied around the base of a ponytail or woven into a braid. Popular with girls of all ages as well as adults, well-placed ribbons make plain hairstyles adorable. Fabric, lace or stretchy ribbons are the best choices for hair. Coordinate colors with wardrobe choices or choose natural colors such as tan or brown to match hair color. When buying ribbon for pets, match their fur or eye color.
Craft Ribbon
Like gift-wrapping, crafting calls for ribbons of all kinds. The type of craft you’re creating will dictate which type of ribbon material you should use. For example, floral arranging commonly uses wide, lightweight fabric poly ribbon while paper mache crafts look better with raffia or paper. If you’re buying ribbons for sewing projects, durable, colorfast fabric ribbons, trims and cords are best.
Home and Party Decor Ribbon
Along with paper streamers, curling ribbon is a popular choice for parties, especially when helium balloons are part of the fun. For a cohesive look, match your ribbons to your table and room decor. If you’re planning a large party with lots of balloons or decorated party favors, consider buying a curling ribbon dispenser.
Product Packaging Ribbon
If you’re a crafter who sells products at craft shows, flea markets or even online, you can increase sales with attractive product packaging. Ribbons are a quick, affordable and easy way to make your wares irresistible. You won’t need to sacrifice profit if you make wise choices and use packaging decor sparingly. Paper ribbon or narrow fabric ribbon is usually adequate for small items. Raffia looks great around wrapped handmade soaps or food products. Use your own artistic judgment to buy the ribbon that best fits your product and budget.
Where and How to Buy Your Ribbon
You have several options for buying ribbons. If you need them immediately, shopping at a local store is your best bet. Department stores often have craft sections, but your color and fabric selection may be limited. A craft store will have a much larger selection. If you need fabric ribbons or trims for sewing projects, you’ll find ribbons designed specifically for this in a fabric store. However, when you buy small amounts of ribbon locally, you will probably end up paying more per inch.
]]>
https://www.fuzzyfabric.com/blogs/news/how-to-decorate-ceiling-with-tulle-and-lights2022-12-02T13:55:05-08:002023-02-22T12:55:10-08:00How to Decorate Ceiling with Tulle and LightsMuralidharan Ramani
Tulle is a fabulous, inexpensive way to decorate a room or large hall for special events such as a wedding, birthday, or baby shower. While the tulle itself is sufficient decoration in most cases, hanging lights with thetullebrings out an atmosphere of beauty, sophistication, and elegance.
1. Figure out how you want to decorate the room. Some people prefer to run the tulle and lights to a focal point at the center of the ceiling. Others may want to put them side-to-side for a “stars in the night” effect.
2. Measure out the tulle pieces so that it is sufficient to drape along the ceiling.
3. Cut several pieces of the 1/8″ ribbon. Each piece should be about a foot long.
4. Lay the tulle on the floor and place the Christmas lights along the center of the tulle. Roll up the tulle with the lights inside.
5. Tie a ribbon piece at each end to secure the tulle and lights together.
6. Use the rest of the ribbon pieces to secure the tulle and lights every 10 inches along the length.
7. Hang the tulle on the ceiling with clear pushpins or removable hooks.
]]>
https://www.fuzzyfabric.com/blogs/news/how-to-make-a-deco-mesh-wreath2022-11-18T08:52:13-08:002023-02-22T12:55:09-08:00How to Make a Deco Mesh WreathMuralidharan Ramani
Items you will need:
1. Begin by unrolling several yards of mesh from your bolt or roll. Do not cut it yet. Keep in mind that the larger your wreath form, the more deco mesh you will need for coverage. Whereas you may only need half of a roll that is 18 inches wide and 25 yards long when you’re making a 16-inch wreath, a larger form will certainly require more tulle. The same is true if you use, say, a 6-inch wide roll, as opposed to a much wider bolt ofdeco mesh.
2. The next step is to cut the pipe cleaners in half. From there you will form the deco mesh into loops to be attached to the wire wreath form. Start by creating a large loop with the loose end of the mesh. Place a pipe cleaner under the outside wire of the wreath form, lay the mesh loop across it, and overlap the ends of the pipe cleaner around both the wire frame and the fabric loop, twisting the pipe cleaner to secure the loop of tulle to the wreath form. The loop should be large and full, but if it is drooping, make it a little smaller.
3. Make a second loop of mesh that is roughly the same size as the first, but this time attach it with your pipe cleaner to the inside ring of wire on your wreath form, so that the first loop of fabric points out and the second one points in towards the center of the wreath.
4. Continue attaching loops to the wreath frame following the outside/inside pattern until you have gone around the entire wreath form. Cut off excess deco mesh if needed. If there are small gaps or uneven loops in your wreath, simply slide and tug at your loops to even them out to your satisfaction.
5. Once you have the deco adjusted to perfection, you can begin embellishing your wreath with ribbons, bows, garlands, braided or jeweled trim, decorative sprays, feathers, artificial flowers, rhinestones, faux birds and butterflies, or even other colors of deco mesh. If you plan to reuse your wreath for various seasons, holidays, and occasions, these items may be attached with pins, pipe cleaners, or other ties. Or if you want to make your embellishments more permanent, consider using a glue gun or sewing them on – whichever seems more appropriate.
]]>
https://www.fuzzyfabric.com/blogs/news/where-to-buy-organza-burlap-pouch-gift-bags2022-11-18T08:45:06-08:002023-02-22T12:55:08-08:00Where to Buy Organza & Burlap Pouch Gift BagsMuralidharan RamaniOrganza Burlap bagswere plentiful in American homes when they transported 100 pounds of potatoes, coffee beans, sweet potatoes and other goods in a breathable fabric that kept the contents fresh. Families found uses for the soft and flexible fabric bags as well as for the cloth flour bags that came along occasionally. Inventive homemakers found ways to repurpose them and put them to good use.
Finding New Uses for Burlap Bags
Descendants of families that used burlap bags for necessity now enjoy using them for creative, stylish and decorative purposes. A search on the Internet is the way to find them now, and one of the best places to start looking is FuzzyFabric.com. Bulk pricing and breaks on shipping give your large or small business a perfect opportunity to add burlap bags your product line.
Colorful and elegant burlap bags give a distinctive appearance to almost any ensemble. Choosing our Natural Burlap Round Bottom Bags provides a neutral accessory that can go anywhere. A bag with a round bottom offers stability even when it is full. Handmade of material that is flexible, each bag is a unique creation that may vary in size.
Small totes are handy for shopping, and they appeal to moms who need to carry toys and games for young children. Our Natural Jute Handle Bags have a basket that stands four inches high, and it has gussets that allow it to sit safely on a flat surface. Each bag’s wide straps extend for four inches as well, making the overall size equal to eight inches. Small straps add a stylish touch to our Small Jute Handle Bags that feature a soft bottom or one that is tailored for a sleek look.
Similar Looks Featuring Linen and Hemp
The combination of rough and smoothfabricscreates an aesthetic fusion that is uniquely appealing. Ourlinen bags with hemp cordfeature a hemp drawstring for easy closure. Natural colored 100% linen bags feature a hemp drawstring for easy closure. Great for packaging your natural ecological items while adding style to your product.
Choosing Larger Bags
Going on shopping trips usually presents a need to carry packages, and our Jute Shopping Bags are large enough to contain many items. The thick handles have a layer of jute over comfortable jute fibers that makes the bag easy to carry. The interior is water resistant, making it a practical choice for a variety of contents. Anything that spills is easy to clean up. At FuzzyFabric.com, we keep customers’ needs in mind so that we can help you meet them. Shopping online with us is the best way to find the most unusual burlap bags, and our huge discounts for bulk purchases save you money as well.
Our Beach Bag Shopper suggests the potential for frivolity that everyone can enjoy on a trip to the beach. Large enough to hold towels, flip-flops, lotions, beach toys, suntan lotion and snacks, the bag has wide straps that protect hands that carry heavy bags. The design provides a flat bottom that sits securely on the sand or a table without tipping over.
Serving the Creative Arts and Crafts Shopper
Our Jute Fabrics come in 10 yard rolls of the most popular colors that include black, white, natural, orange and moss. Customers who have creative ideas for using jute are likely to appreciate the convenience that you offer by carrying a line of yard goods for them. Jute is a soft material, and its flexibility often makes it difficult for retailers to cut a piece to the size that their customers desire. A tip to pass along is that removing one strand of fiber makes a line appear in the fabric. Following it makes it easy to cut a straight path across the material.
The popularity of burlap creates a demand that you can meet for your customers by providing stylish burlap bags and jute yard goods for arts and crafts projects. At FuzzyFabric.com, we offer the convenience of online shopping, huge discounts, and free shipping for qualifying orders.
]]>
https://www.fuzzyfabric.com/blogs/news/how-to-make-a-beautiful-christmas-wreath2022-11-18T08:33:35-08:002023-02-22T12:55:07-08:00How To Make A Beautiful Christmas WreathMuralidharan RamaniMerry crafty days! This holiday season, we’re decorating big, bold, and spicy with a gingerbread inspired deco mesh Christmas wreath.
Wreaths add a festive element to our holiday decorations that we adore. They’re also easy to make. Join us as we design ourselves a super easy (and super cute!) DIY deco mesh wreath for the holidays. Let’s get started.
Make Your Own Gingerbread Inspired Christmas Wreath
Just a note: Your base will be the easiest and most important part of this project! The trick is to completely cover your frame and periodically fluff your deco mesh out to create volume.
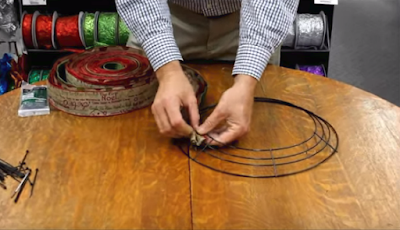
1.) First, prepare your Christmas wreath frame using your pipe cleaners. Evenly space your pipe cleaners around the frame. On our frame, we use 8 pipe cleaners on the inner frame and 8 on the outer edges.
2.) Next, make your base by starting with the inner part of your frame. Simply, gather the edge of your deco mesh and attach it to your frame using the pipe cleaners. As you attach your deco mesh, start shaping your loops. We use about 9 inches of deco mesh to create a single loop. This little trick ensures full wire frame coverage and maximum volume. Continue this step until the inner part of your frame is fully covered.
3.) Once your inner frame is fully covered, move onto the outer edges of your frame. Continue until completely covered. Once fully covered, trim your deco mesh and tuck the loose end into your wreath.
4.) Next, prep your embellishments by trimming each of your ribbons to 12”. To create a festive look all around our wreath, we cut 8 ribbons from each pattern.
5.) Finish ribbon edges by simply folding each end in half and trimming at an angle. This gives you that charming V-shaped finish.
6.) Once the ribbon edges are finished, begin attaching them to your wreath! Choose two styles of ribbons and layer them onto each other. Cinch the center and attach your ribbon to the frame using the pipe cleaners. If your pipe cleaner ends are too long, trim. Continue until all your ribbon embellishments are attached.
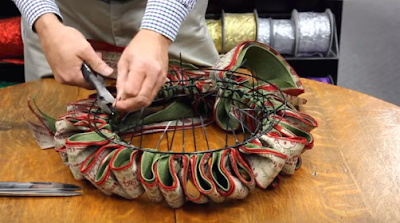
7.) Once you’ve finished attaching your ribbon embellishments, step back and examine your handiwork. Don’t be afraid to fluff your loops out a little more. The bigger, the better!
8.) Finally, display to your heart’s content!
Additional Embellishments
Wreaths are great because you can personalize them with all the whimsy in the world. Here are a few of our other favorite embellishments that we like to deck our wreaths with.
Simple Christmas Patterns | Printed patterns are an easy way to incorporate a specific theme or message into our wreaths.
Christmas Ribbons In Sheer Fabric | Sheer fabrics offer an elegant and unique layer to our decorative craft projects.
Rustic + Natural Inspired Textures | Rustic textures and accents add a comforting element to our decor.
]]>
https://www.fuzzyfabric.com/blogs/news/christmas-decoration-ideas2022-11-09T10:10:52-08:002023-02-22T12:55:06-08:00Christmas Decoration Ideas 2022Muralidharan Ramani
Looking for the ideal tree topper but seeking something unusual? May we advise Christmas tree ribbons as a new favorite technique to trim your tree. These ornaments are the ideal finishing touch for your Christmas tree. You wouldn't leave a nicely wrapped holiday gift unattended without a bow, so don't do it with your tree either! Below are some of the best Christmas tree ribbon designs
You must first choose the sort of ribbon you wish to use before deciding how to decorate the tree. Try something like a broad Tartan ribbon if your tree has a traditional Christmas feel. Jute or burlap ribbon is definitely the best option for you if your fashion is a little more rustic. The perfect ribbon for Christmas glam enthusiasts is one with metallic undertones or made of lustrous satin. Grab your best Christmas light clips and ribbon-cutting scissors to hold everything in place while you experiment with the look.
How Can You Use Ribbons to Decorate? Your Christmas tree can use ribbon in a variety of ways, from straightforward ribbon ties to a full-on ribbon explosion with ribbon Christmas garlands or a ribbon Christmas tree topper. While some concepts might take a bit longer to develop than others, once you have the fundamentals established, they are always simple to produce.
Here's how to use these items to decorate your tree:
1. A Ribbon Wreath Start at the top of your tree and use a clip to fasten the ribbon end to a branch. As you come down, carefully thread your way around the tree, crossing over and beneath branches. If you run out of ribbon in the middle of your project, clip the end off and replace it with a fresh strand, then continue. For a more structured appearance, you can alternatively use wire-edged ribbon.
2. Vertical Ribbon Strands Starting with six to eight lengths of ribbon that are each about a foot longer than the height of your tree, you may begin decorating. (If you want the ribbon to look fuller, cut more strips.) Each ribbon should have one end clipped to the top of the tree. To conceal all the clips, we advise purchasing a sizable tree topper! Each strand should cascade down the tree before being tucked back into the desired fold.
3. Ribbon Tree Topper The steps for tying a ribbon tree topper are similar to those for tying a standard bow. To ensure that your bow maintains its shape during the whole holiday season, we suggest using a wire-edged ribbon. Cut a strip of ribbon first, leaving you with no shorter than six-inch tails. Then, you may either make a basic two-loop bow to tie it to the top of the tree, or you can make several loops for an eye-catching appearance.
Giving your holiday centerpiece a designer look is a smart way to add ribbon to a Christmas tree. Whether they're woven into the branches or cascade from the top, they're lovely.
]]>
https://www.fuzzyfabric.com/blogs/news/how-to-make-a-beautiful-sheer-chair-sashes-rosette2022-08-04T09:52:43-07:002023-02-22T12:55:05-08:00How to Make a Beautiful Sheer Chair Sashes Rosette?Muralidharan Ramani click here to buy : chair chases
Center the fabric
Tie a basic knot to secure the fabric to the chair.
Twist each strand in opposite directions
Twist the pair together.
Coil the twisted fabrics.
Knot the loose ends to secure
The rosette can be made with or without tails. You’ll need about 8 feet of fabric to make it with tails, or about 5 feet without. For your first chair bow, start with a little more fabric than you think you you’ll need, as you can always trim the excess. You’ll probably want to trim the ends of the “with tails” version a little also, just to make sure the ends match perfectly.
Expect to spend about 10 minutes making your first rosette, but as you get the hang of it you should find it goes much quicker. With a material cost of only about $3 per per bow, this is an extremely affordable way to decorate your chairs.
Feel free to leave us a comment if you have any questions!
Showing the Rosette Chair Bow with and without fabric tails]]>
https://www.fuzzyfabric.com/blogs/news/tulle-bolt-wedding-decoration-bolt-pew-craft-favor-fabric-bridal-favor-party-banquet-gift-decor2022-08-02T11:32:54-07:002023-02-22T12:55:04-08:00TULLE Bolt Wedding Decoration Bolt Pew Craft Favor Fabric Bridal Favor Party Banquet Gift DecorMuralidharan RamaniTulle Fabric Bolt
Embrace the sheer beauty of tulle by crafting stunning veils, bows, dresses, and gift bags, or drape down the ceilings, backdrops, tables, chairs, aisles, and arches to impart a dreamy allure all around your party space. Pair mesmerizing hues of our tulle fabric with matching satin drapes to create wonderful wraps for your table centerpieces for a lovely puffy appeal.
Fabric Bolts By Yard
Nothing beats the softness and delicateness of tulle fabric when we speak of ethereal beauty. The pretty puffy appeal and subtle shine of tulle give a true fantasy feel when swathed around the tables adding a mesmeric charm to your party ambiance. Showcase your classy sense of style by enhancing your décor with these splendidly sensuous tulle drapes and making a mesmerizing statement to delight all your guests with its charming appeal.
Wholesale Fabric Rolls
Not only is tulle good for adding flair and finesse to your event décor and dress designs but also for sprucing up the party ambiance to a whole new level of elegance. Usher a dreamy charm into your wedding reception, birthday, bridal shower, or baby shower party by creatively draping our tulle fabric just the way you want to add a classy touch to your décor.
Additional Information:
This tulle is light, airy and at the same time luxurious. Its high quality means that it can hold its shape and resist wrinkling which is perfect to make gorgeous tutus, costumes, dresses and wedding gowns.
]]>
https://www.fuzzyfabric.com/blogs/news/how-to-make-a-pretty-wedding-wreath-step-by-step2022-07-20T10:45:57-07:002023-02-22T12:55:04-08:00How to Make a Pretty Wedding Wreath – Step by StepMuralidharan RamaniA wedding wreath is an attractive and simple idea for wedding decoration, for any theme and period. Luxurious floral, fir branches, foliage, and leaves, branches and berries, ribbon and speech marks – you’ll absolutely find a wreath to fitting your decor.
Wreaths are generally dangled on entrances of the church, your home, or venue, they can be also drooped on the chairs and in the passageway for decor. You can use them as a backdrop for your ritual or reception, for taking pics in the photo booth, and for beautifying chandeliers and centerpieces. It is ideal to find one of the best wedding and craft product suppliers for buying mesh ribbons, tulle fabric, lace fabric, grosgrain ribbon, and many others.
Below, I’m going to share a step-by-step guide for making a beautiful wreath for the front door.
Materials You Will Need:
12-inch Grapevine wreath
Silk flower bushes
Ribbon
Florist wire
Wire cutters
Hot glue gun
Glue sticks
Craft mat
Instructions:
Step 1:
Stary by including ribbon in your wreath. You can use different colors of ribbons. For adding the tails, cut the length of ribbon you will need, wrap it around the bottom of the wreath and make a knot. Repeat this process with each ribbon.
Step 2:
Use roses as your focal point. For making the roses and other flowers and greenery, you will need to trim the stems required and remove extra plastic coatings on the stems. You should open up and spread-out stems and florae, so they will look full.
Step 3:
Now, place your florae on the wreath to consider accurately where you want them before you hot glue. Place the flower stems down in the grapevine wreath to fleece them.
Step 4:
Once you have the roses place them where you like and stick them in place by adding hot glue to the stem and set the stem into the grapevine wreath.
Step 5:
Next, add extra flowers and greenery where you like and wait to hot glue while waiting for you to be sure of their placement.
Step 6:
This should be actually a full, fleecy wreath! Endure filling it in anywhere you have an unfilled space.
The above-mentioned instructions will help you to make a wedding wreath at home. You can find anonline fabric supplier for buying different types of fabrics, ribbons by the yard, chair covers, tablecloths, and many others at reasonable prices.
]]>
https://www.fuzzyfabric.com/blogs/news/diy-patriotic-ribbon-flag-wand-july-4th-usa2022-06-29T11:51:34-07:002023-02-22T12:55:03-08:00DIY Patriotic Ribbon Flag Wand - July 4th USAMuralidharan Ramani
Start by giving a few wooden dowels a coat of spray paint in red, white, or blue. Let dry.
Before you can screw the eye screw into the end of the dowel, you will need to create a pilot hole so you don’t split the wood. Hammer a very small nail into the end of each dowel and remove it. Now you can screw in the eye screw, using pliers if you need to. Add a lanyard clasp finding to the eye screw.
Flag Ribbons click Chevron Ribbon click polka Dot Ribbon click
I received these gorgeous patriotic ribbons from The Fuzzy Fabric, and they were perfect for this project. I think the American Flag ribbon might be my favorite, but the glittery ribbon is a close second.
I cut each ribbon into 4 foot lengths and threaded the ribbons onto the clasp finding. If the ribbons aren’t secure, you can tie them off in a knot to keep them attached.
My kids love playing with the ribbon wands, dancing around and waving the ribbons. The wands would be great to take along to wave as you watch a summer parade or while you are waiting for the fireworks to start!
All the ribbons featured in this tutorial can be bought fromFuzzy Fabric. I’ve gathered links to the rest of the materials I used in this tutorial.
]]>
https://www.fuzzyfabric.com/blogs/news/8-ways-to-craft-with-ribbon-ideas-all-seasons2022-06-14T16:01:47-07:002023-02-22T12:55:02-08:008 Ways to Craft With Ribbon Ideas - All SeasonsMuralidharan Ramani1. Ribbon Flowers
Have any scrap ribbon and buttons leftover from a sewing project? Turn them into these adorable, easy-to-make ribbon flowers at no extra cost to you. These look great adorned to headbands, bags, or even as magnets. Or, spend a crafternoon with kids and make a whole bunch.
2. Ribbon Wreath
This pretty wreath is perfect for winter and holiday decor. You can switch up the ribbon and flowers for a spring or summer wreath as well. We love how simple this craft is—even your kids can help you assemble for a fun crafternoon.
3. Ribbon Embroidery
If you have a knack for needlecrafts, you have to try your hand at this embroidery technique. Use ribbon instead of string to create a stunning textured flower bouquet.
4. Ribbon Heart Hair Bow
Weave red and pink ribbons into a heart and wear it as a hair bow. Although this ribbon hair bow was originally made for Valentine's day, we think it would look sweet on a little girl at any time of the year.
5. Recycle an Old Lampshade Into a Chandelier
Do you have an old lampshade that has seen better days? Recycle it into a beautiful ribbon chandelier. This repurposed shade is so pretty you will want to make more! Why not make one as a decoration for your next bridal shower or even as wedding decor?
6. Ribbon Wall Hanging
If you are a fan of bohemian-style home decor, then this project is for you. Knot neutral or pastel-colored ribbons in a row onto a branch. Vary the length of the ribbons so that you have a point in the middle of the wall hanging. Attach old keys, beads or jewels onto the fabric strips to add interest. What a thrifty and creative way
7. Christmas Ribbon Star Ornaments
This beautiful ribbon Christmas star is inspired by a traditional Danish paper craft with a twist. Instead of using paper strips, swap them out with ribbon to make this delightful ornament for your tree. The Christmas star looks exceptionally pretty with red and white striped ribbon but would be lovely in another color as well.
8. Sunflower Wreath With Ribbon Rose Center
Welcome your guests with an oversized cheery sunflower wreath hanging on your front door. Paper mesh and burlap ribbon magically become a big beautiful sunflower. A lovely way to bring good cheer and sunshine to all who enter your home.
]]>
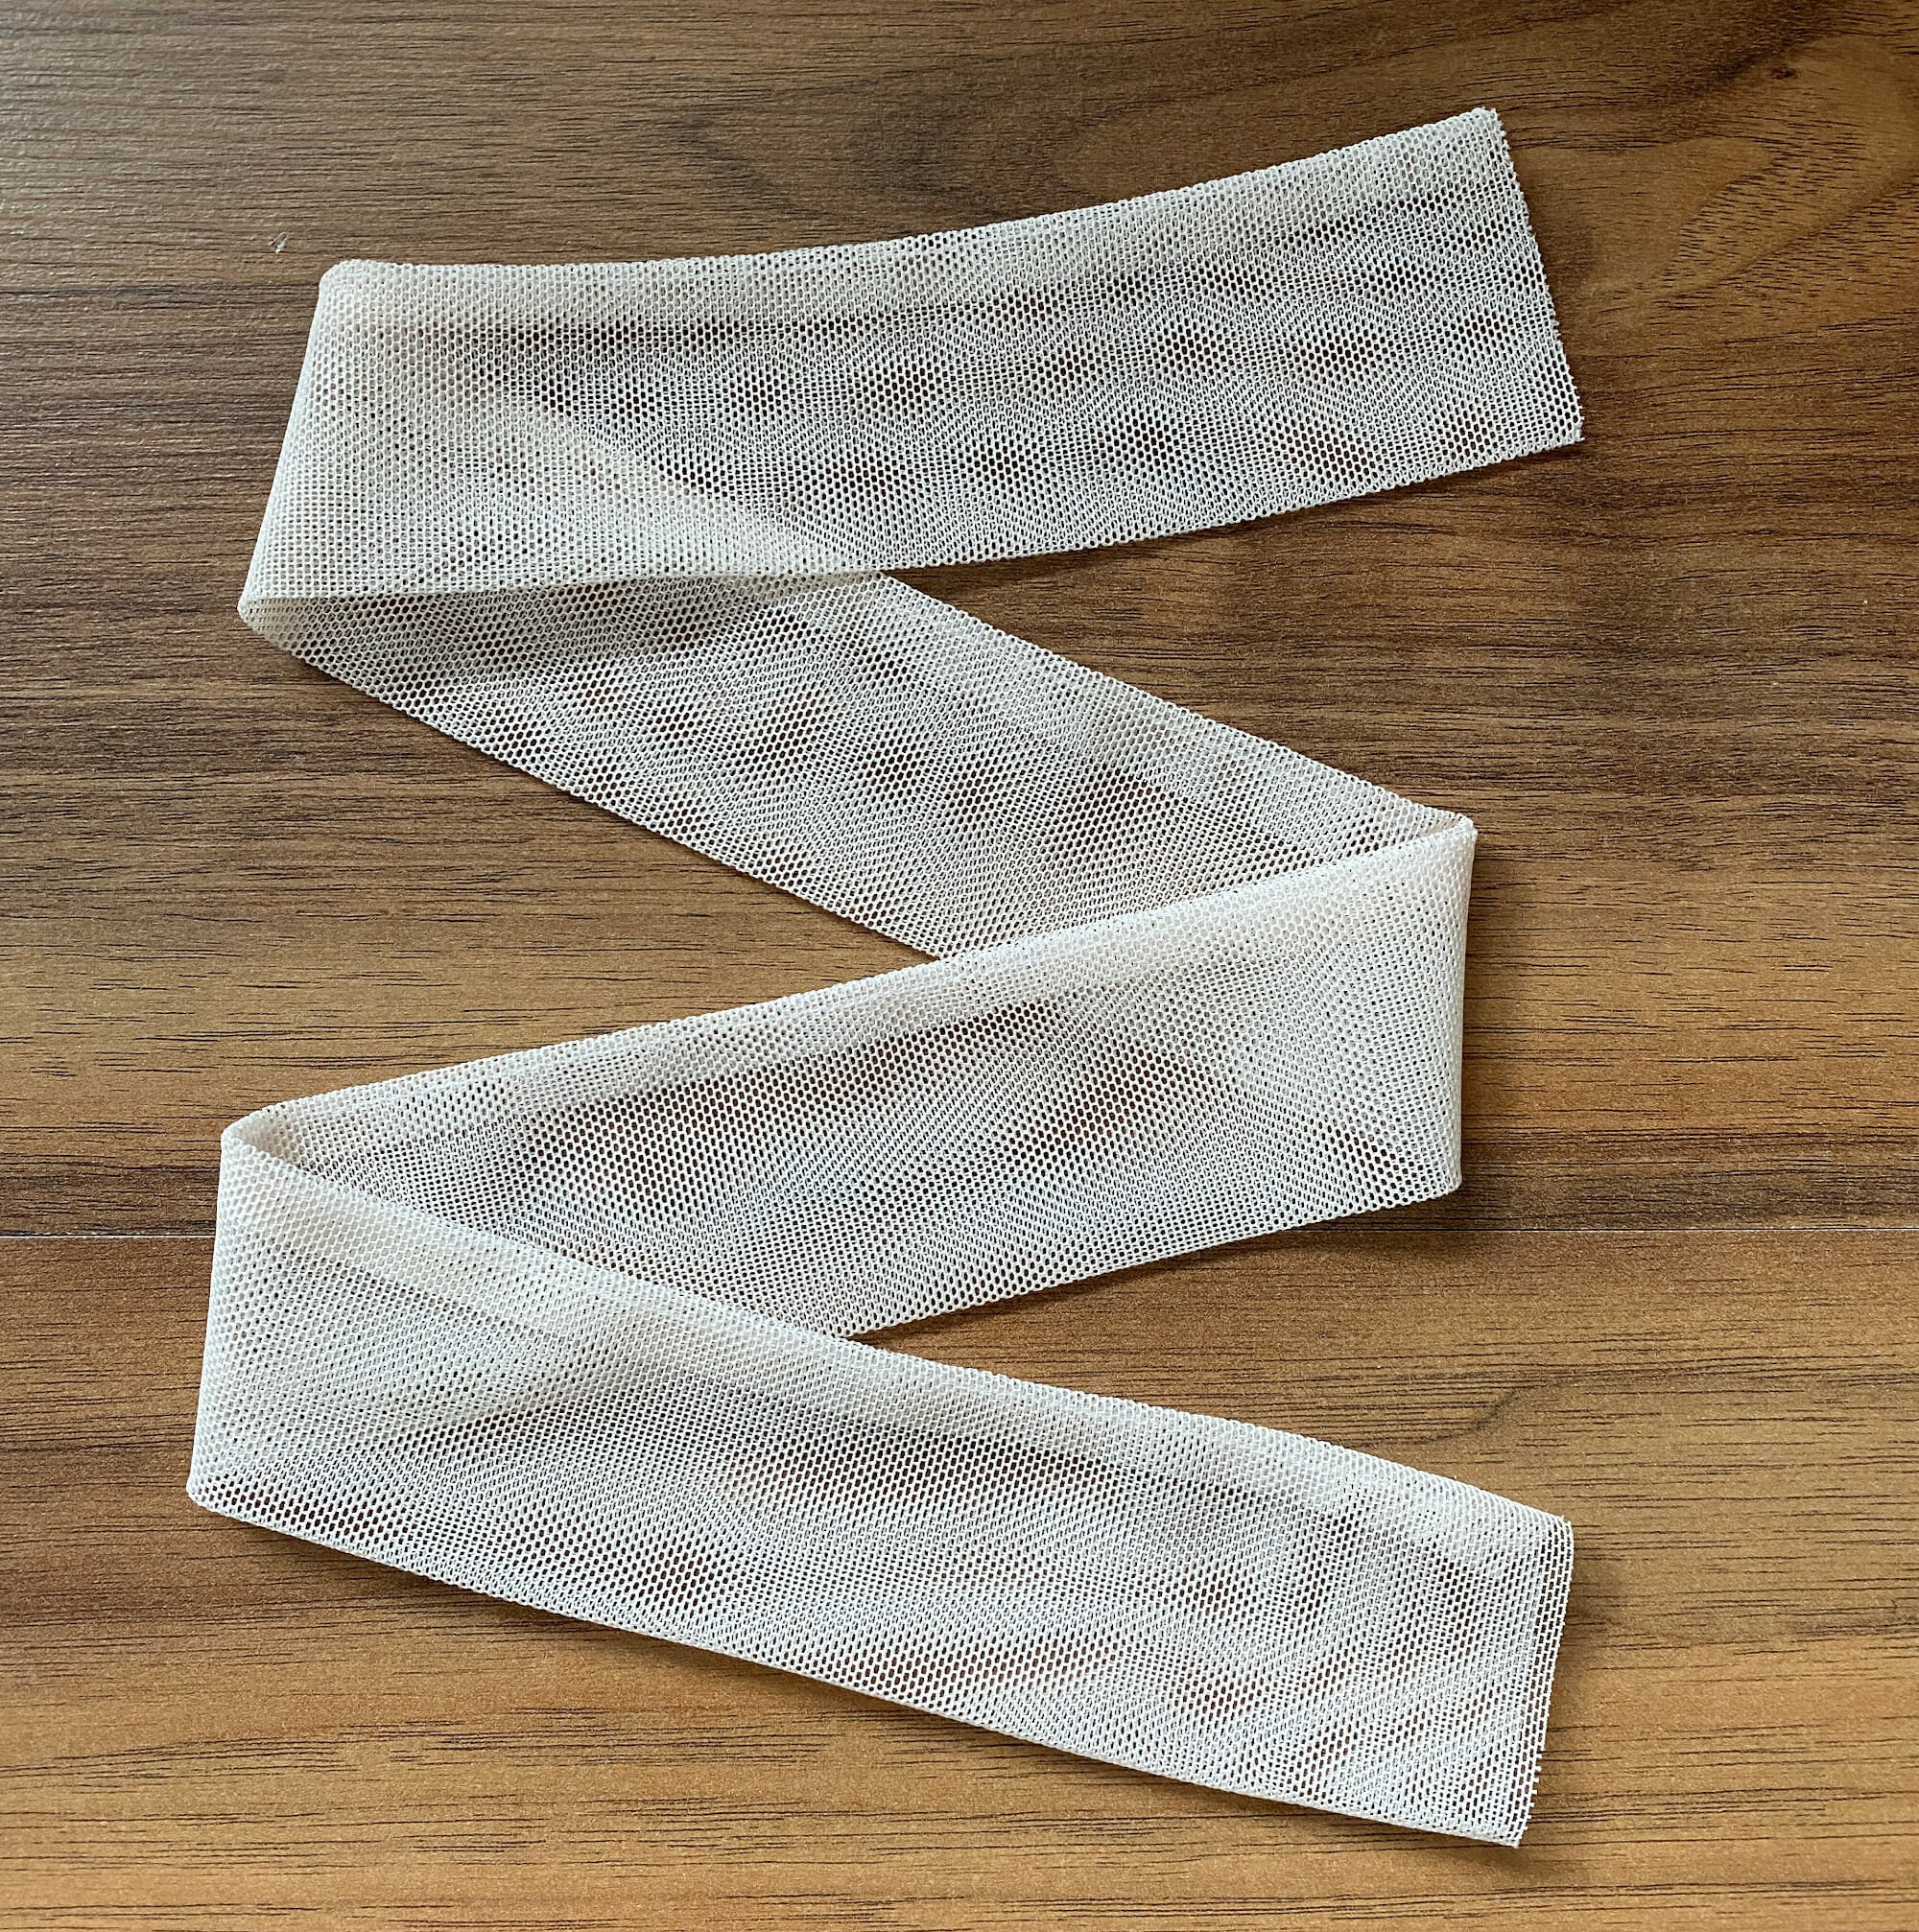
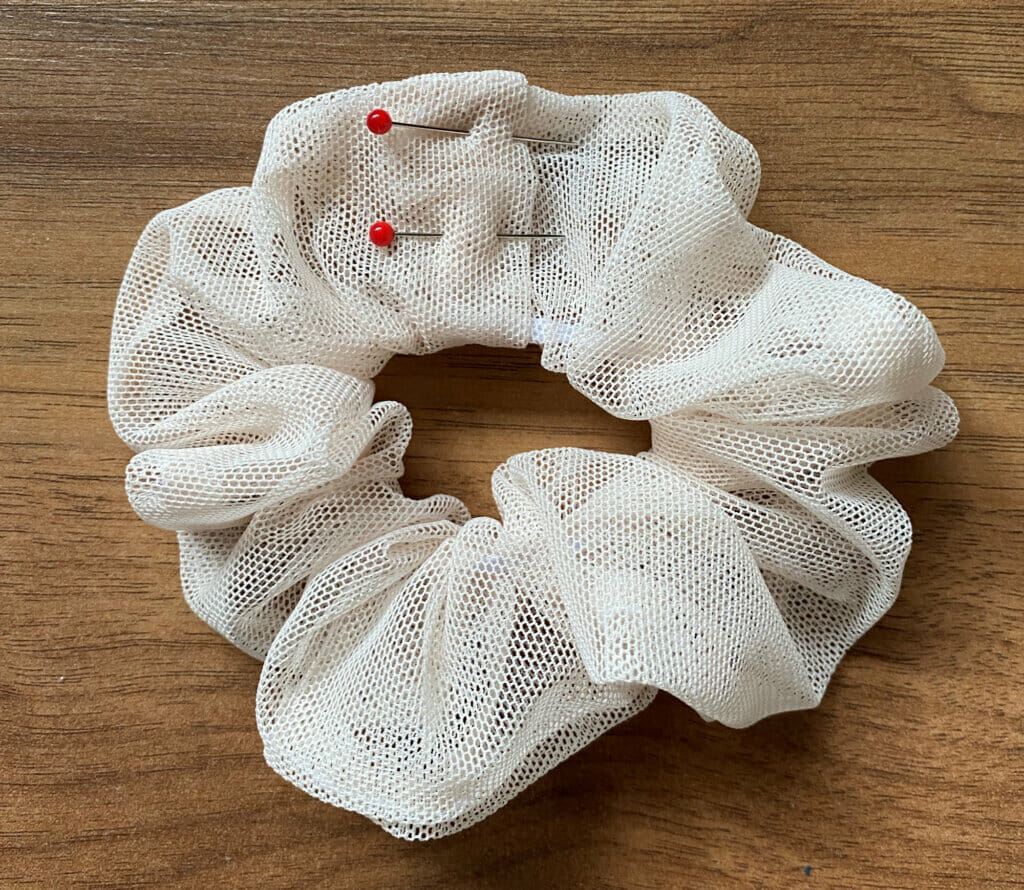
https://www.fuzzyfabric.com/blogs/news/how-to-make-tulle-scrunchies-step-by-step-tutorial2022-06-08T10:02:33-07:002023-02-22T12:55:01-08:00How to make tulle scrunchies. Step-by-step tutorialMuralidharan RamaniTulle scrunchies tutorial – sewing supplies
First, cut a piece of tulle with your scissors or rotary cutter that is anywhere from 20 to 30 inches long and 4 inches wide.
You can increase or decrease the length of the tulle piece as you like, depending on how many folds you want your scrunchie to have.
For this scrunchie, I used a piece of tulle measuring 25” x 4”.
Step 2
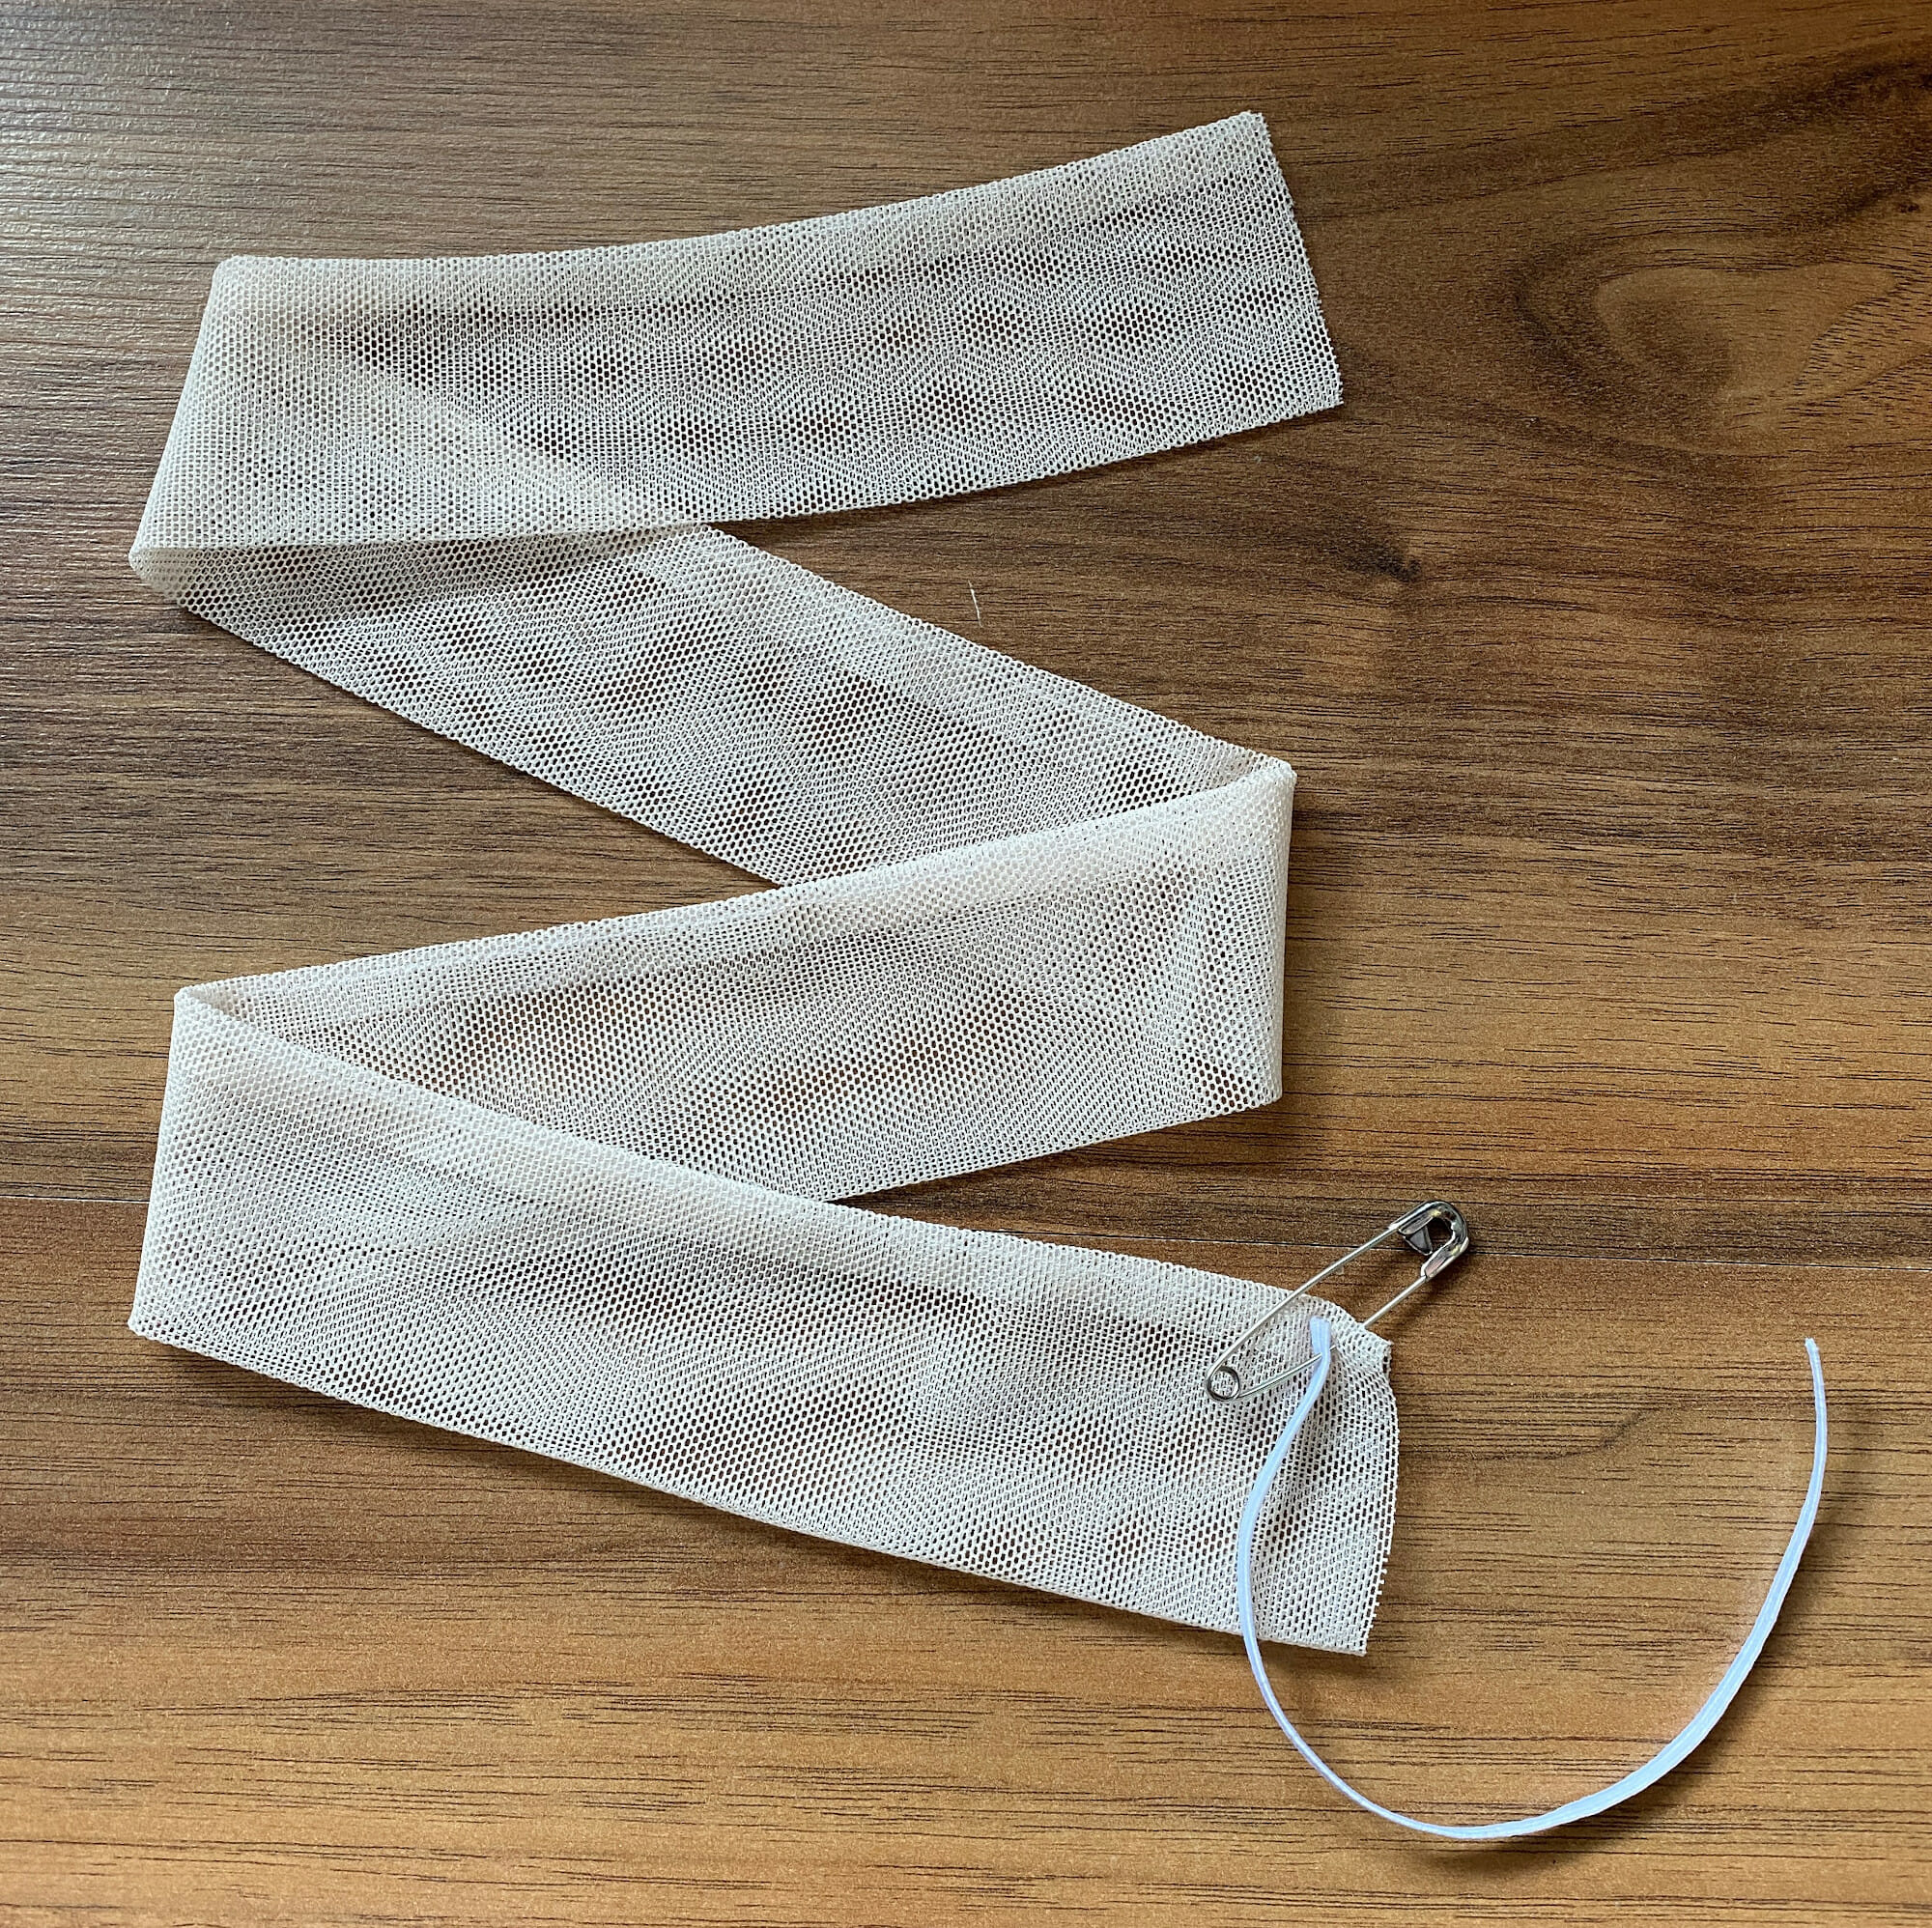
Now, fold your tulle rectangle lengthwise and sew down the length of the tube. Use a narrow 1/4” seam allowance (or 3/8” if you are a beginner) to make a tube with two open ends.
Do not start stitching at the very edge or else your sewing machine may try to eat this lightweight fabric. Backstitch when you begin and end the tulle seam.The size 70/10jersey/ballpoint needlethat worked fine for the soft tulle scrunchies simply refused to sew mesh tulle without skipping stitches.
Apparently, stretch needles are better for sewing very stretchy fabrics. However, it’s a good idea to test your stitches with both needles (jersey and stretch) on your fabric before starting your project.
Tulle can be a little tricky to sew – inthis article, you’ll find my best tips for sewing tulle on your regular sewing machine.
Step 3
Turn the tube inside out. I usually take a safety pin, attach it to the seam allowance, then push it through the tube to the other side. Press your tulle tube with an iron set at the lowest temperature.
Step 4
Cut 6 inches of 1/8” elastic. Take one safety pin and secure the elastic at the end of the tulle tube. (Because you don’t want to lose the elastic into the tube.)
Then take another safety pin, attach it to the other end of the elastic and thread it through the tube.
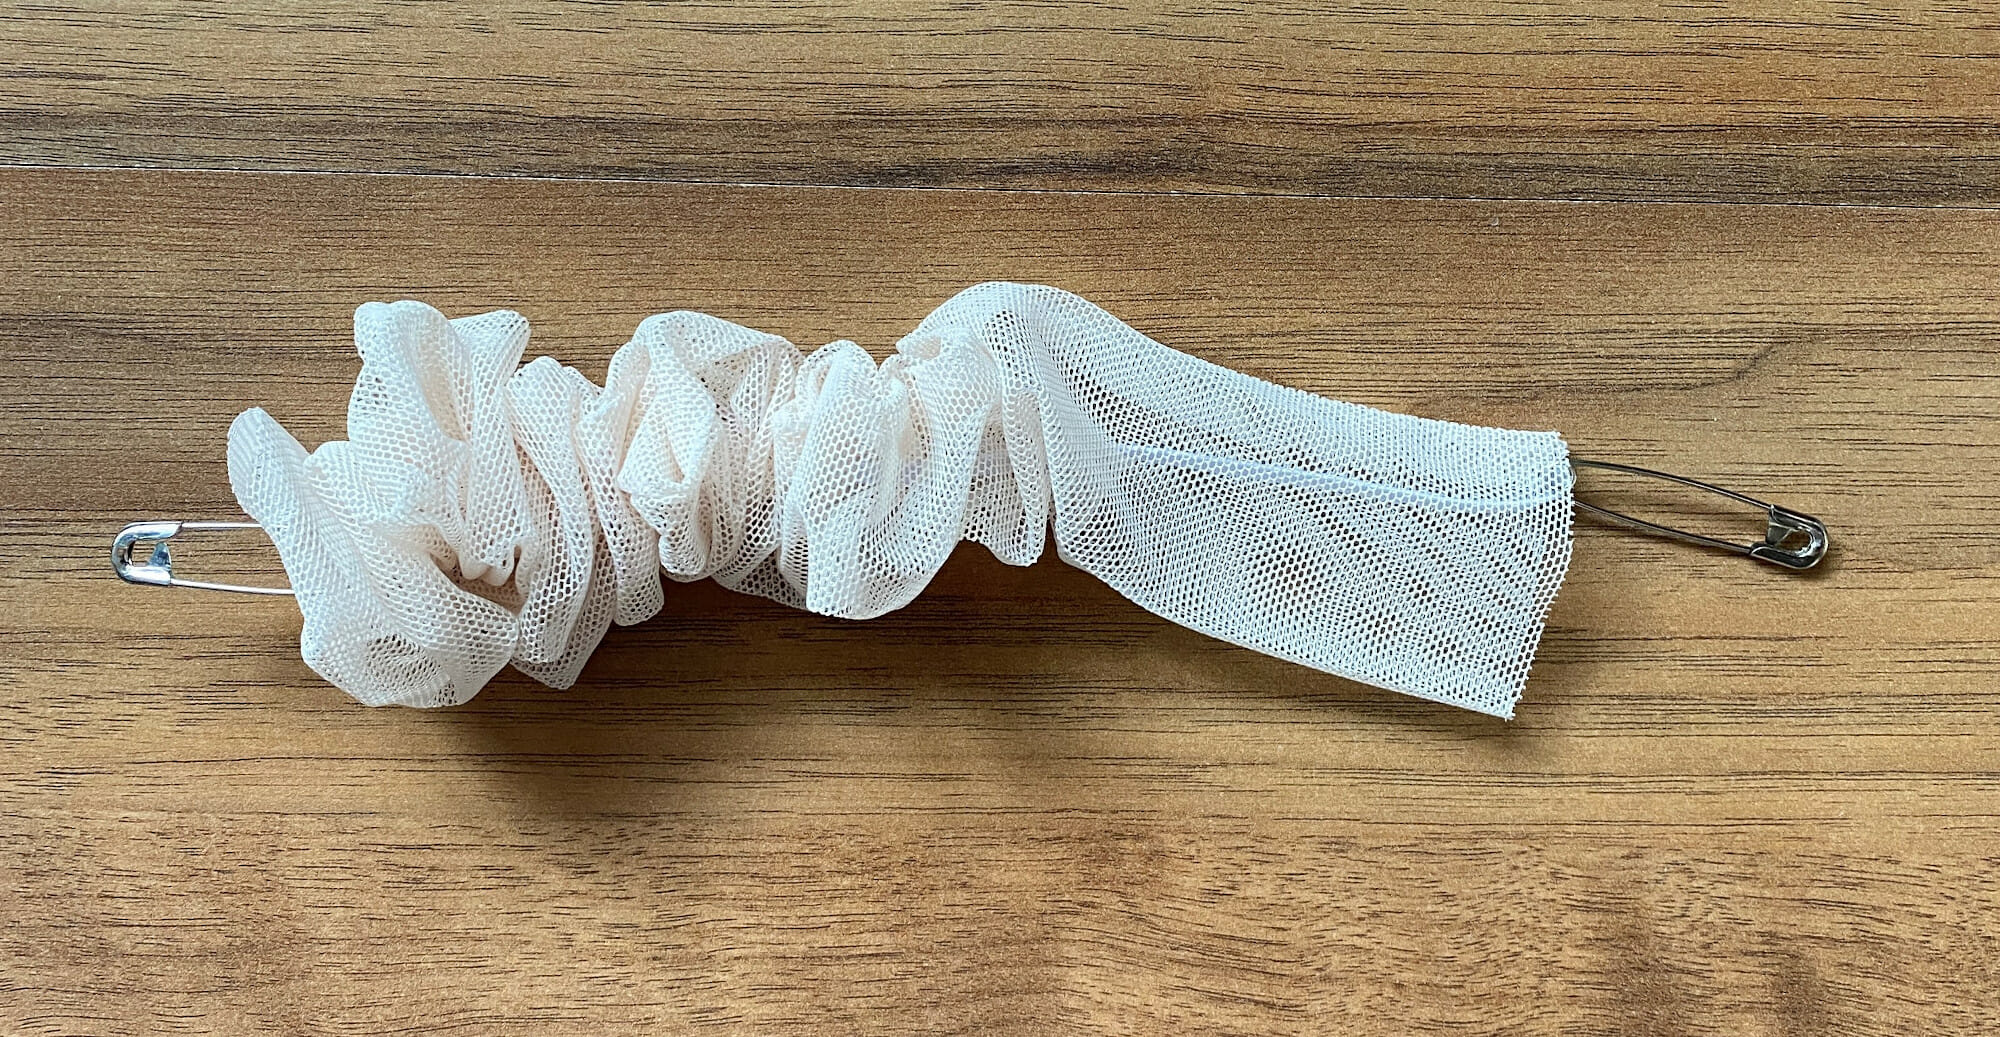
Step 5
Tie the two ends of the elastic together. Of course, you can sew both ends of the elastic together, but the fastest way is to tie the elastic. After that, push the elastic back into the tube so the knot is hidden inside.
At this point, you can try the tulle scrunchie on your hair and see if it’s a good size for your hair. If it’s too big or small, adjust the elastic length accordingly.
Also, if you want to use pompoms or small flowers, now is the time to put them into your tube.
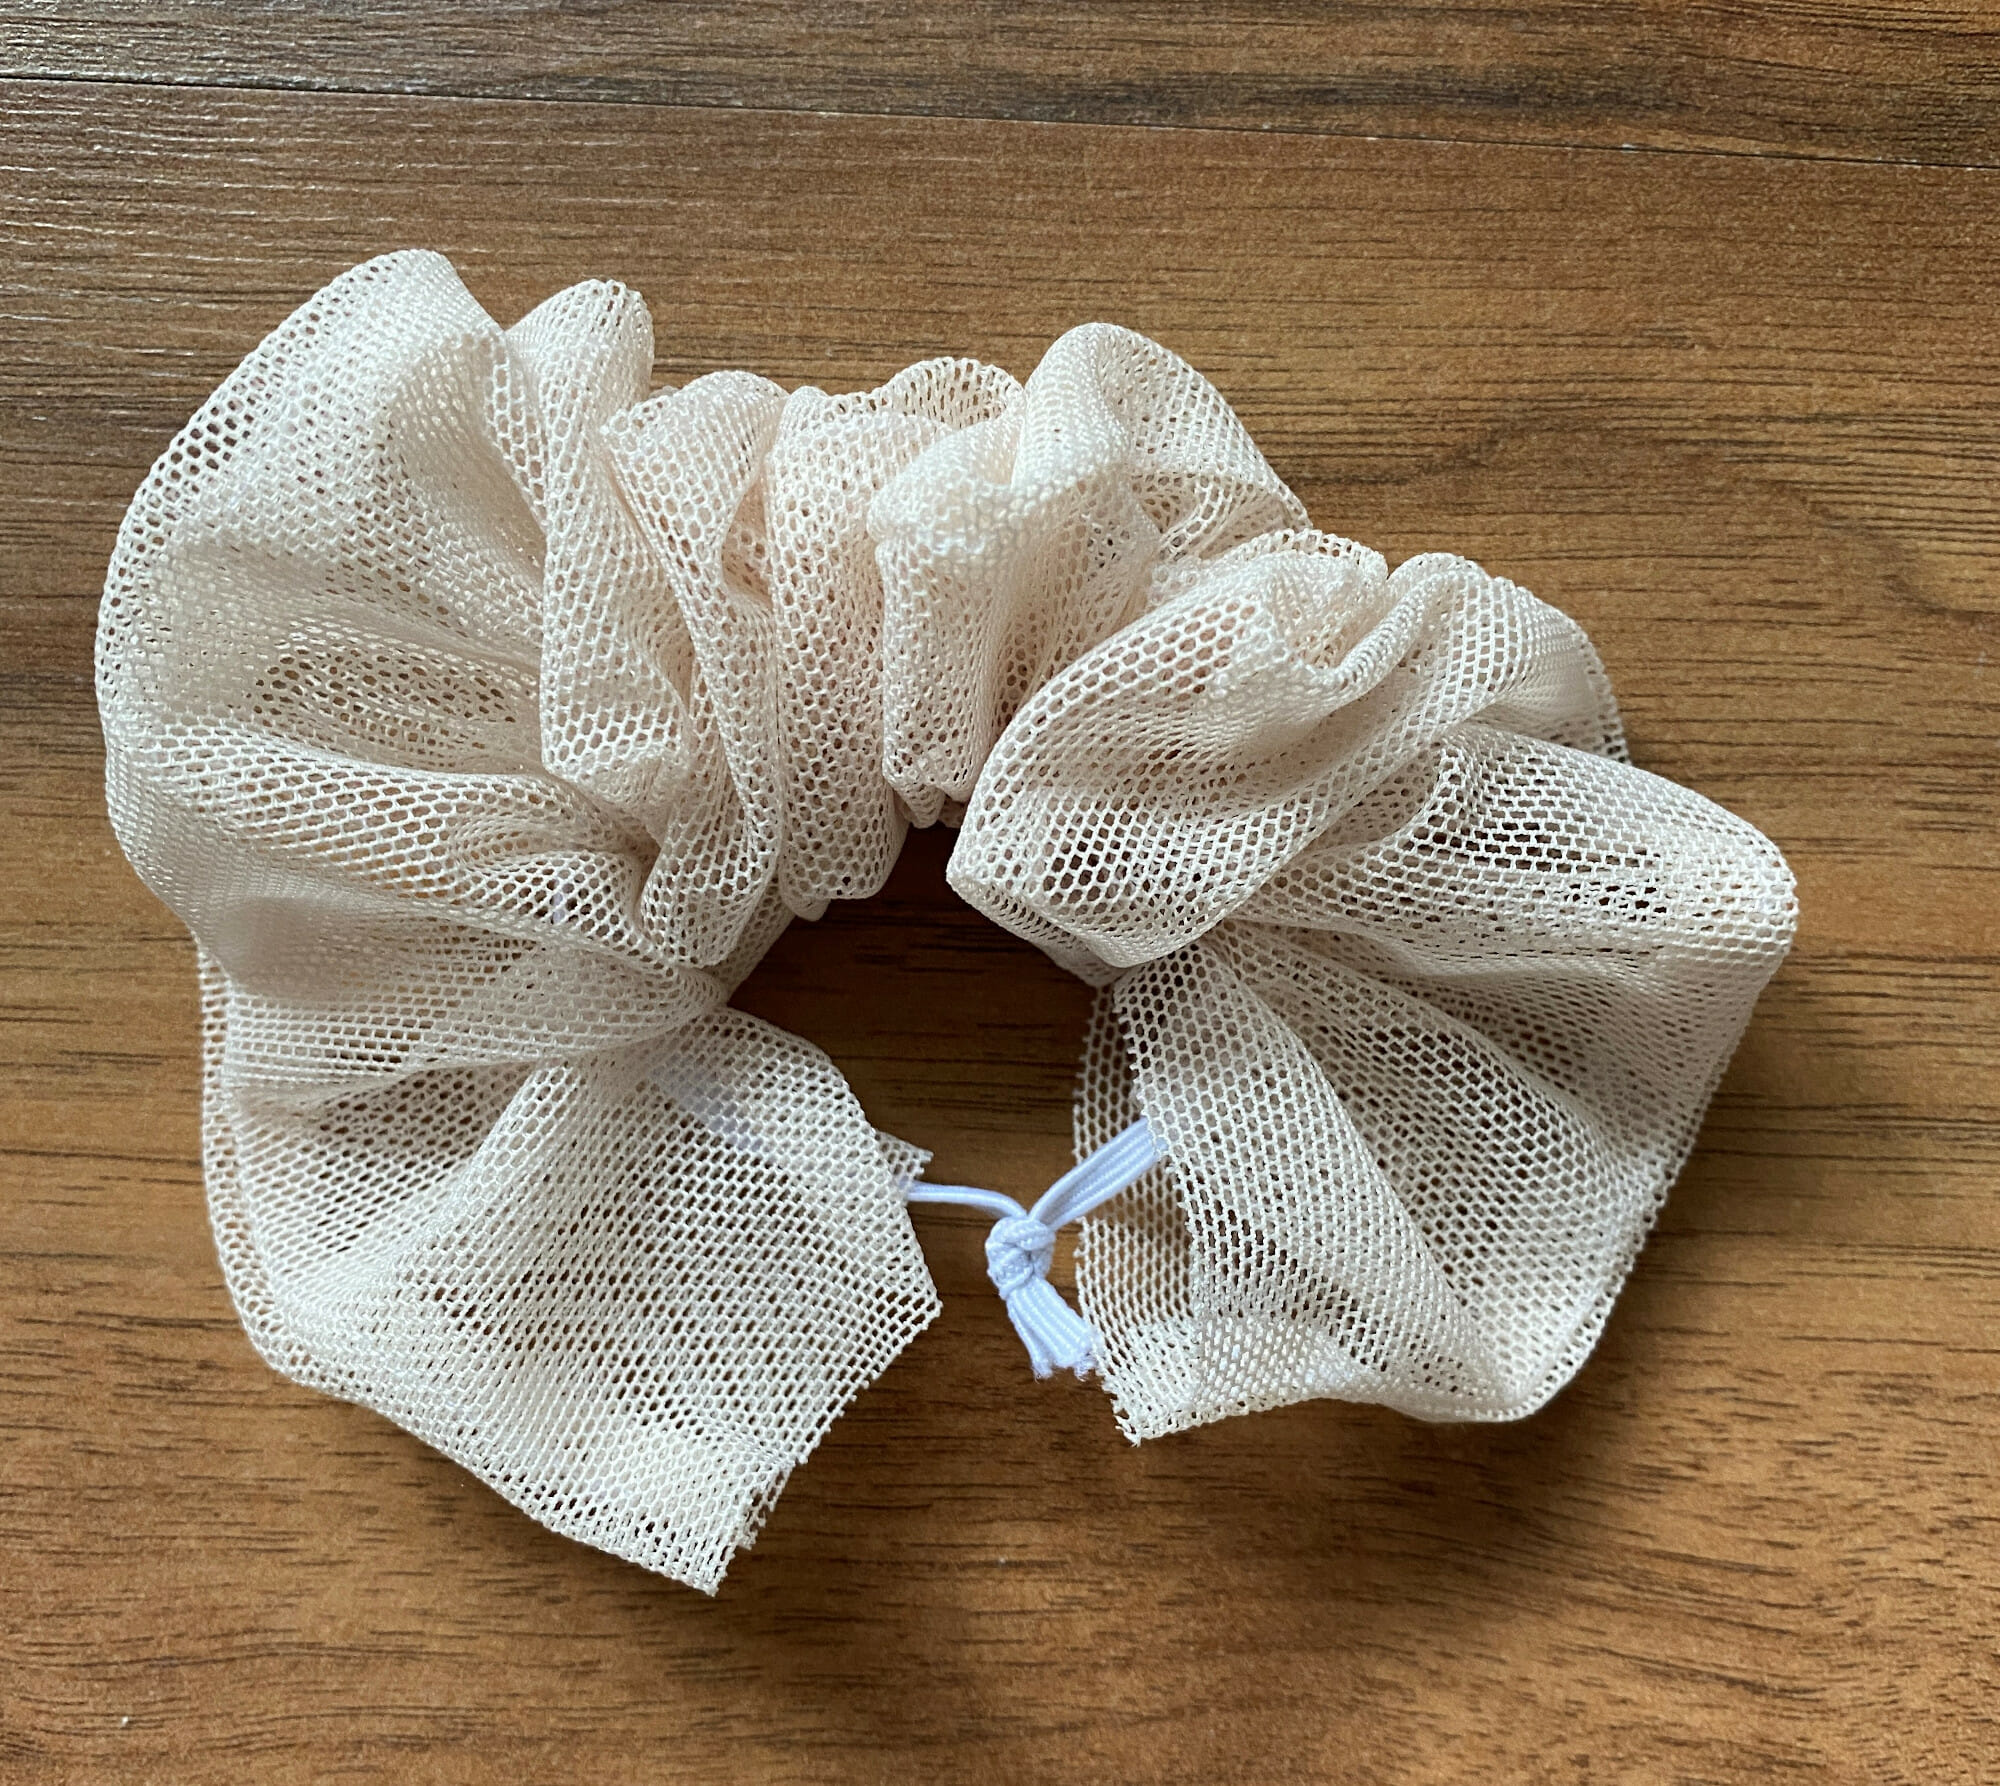
Step 6
Now, straighten the tulle fabric to make sure the seam is not twisted. The seam should be in the same position all the way around the scrunchie.
Fold one short end of tube 1/2″ toward the wrong side. Finally, let’s bring the tube edges together and finish this scrunchie. Put the raw end of the tube inside the folded end and overlap by 1/2″ so the inside raw edge is hidden.
Make sure the tulle seams line up and use one or two pins to secure the overlapped ends. Sew to close the gap. Again, backstitch at the beginning and at the end of the seam. I like to stop just before I reach the elastic – something I wouldn’t be comfortable doing with a cotton scrunchie, but tulle doesn’t fray, so it’s a safe bet.
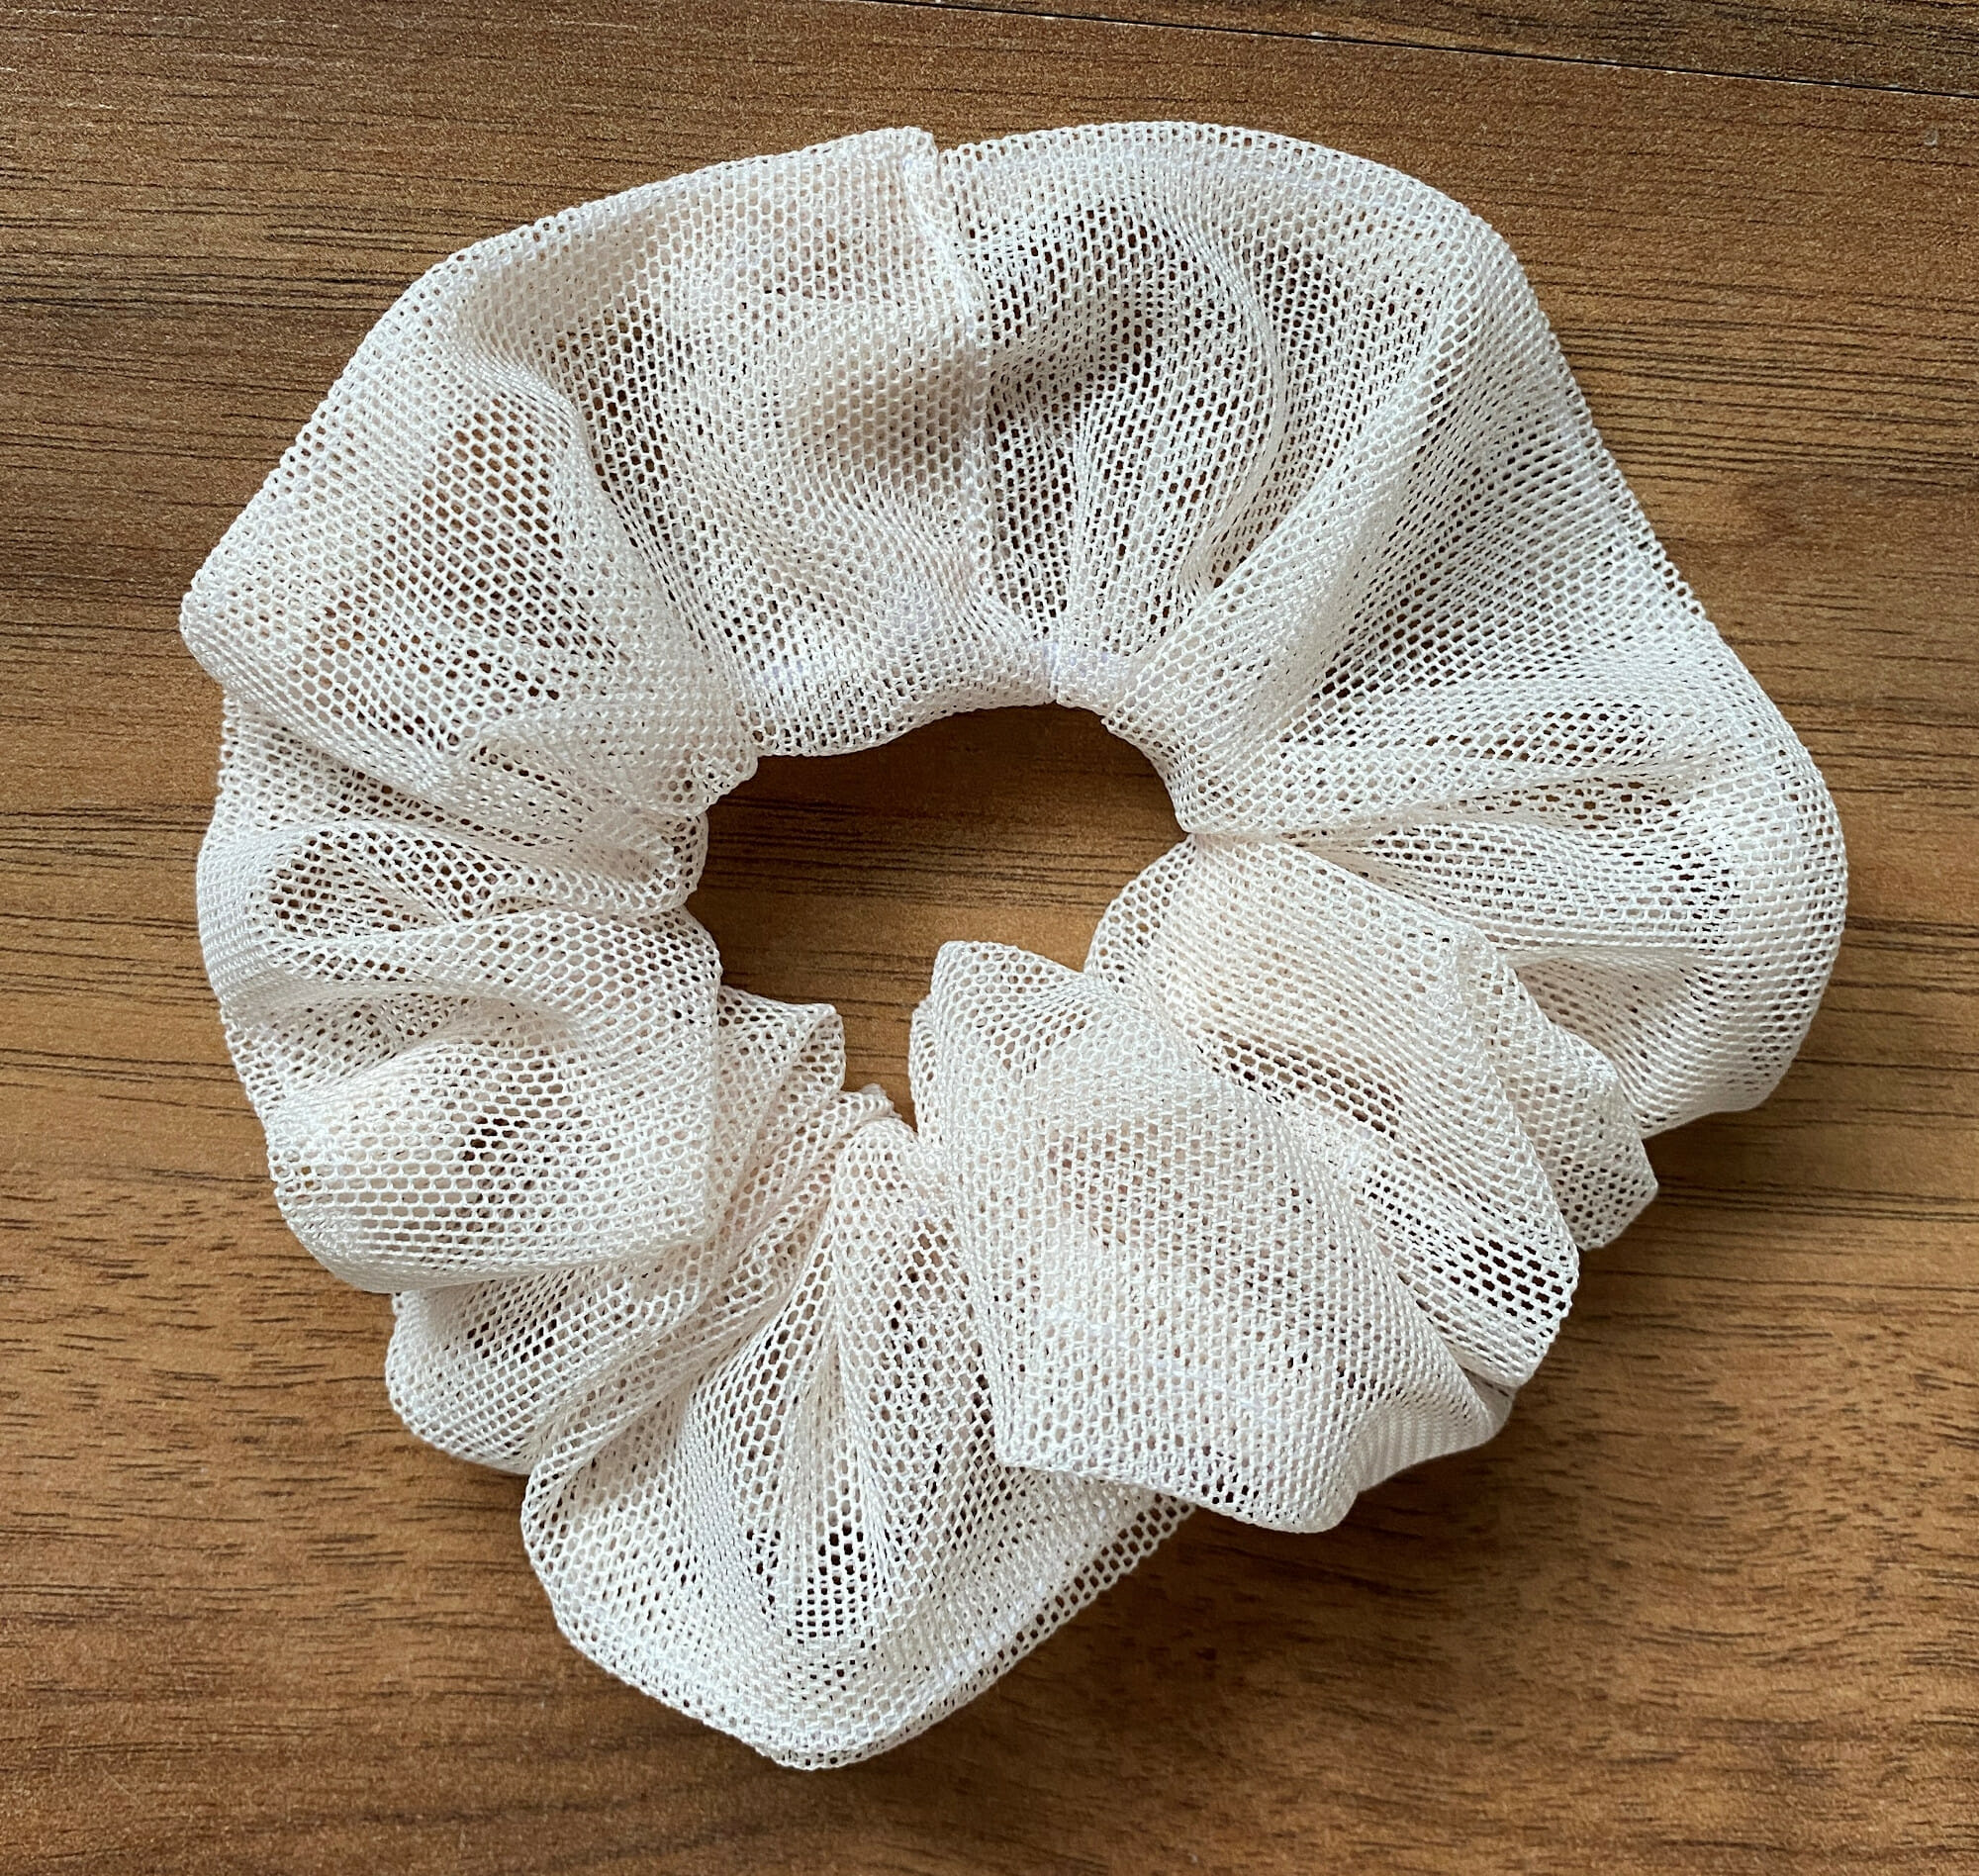
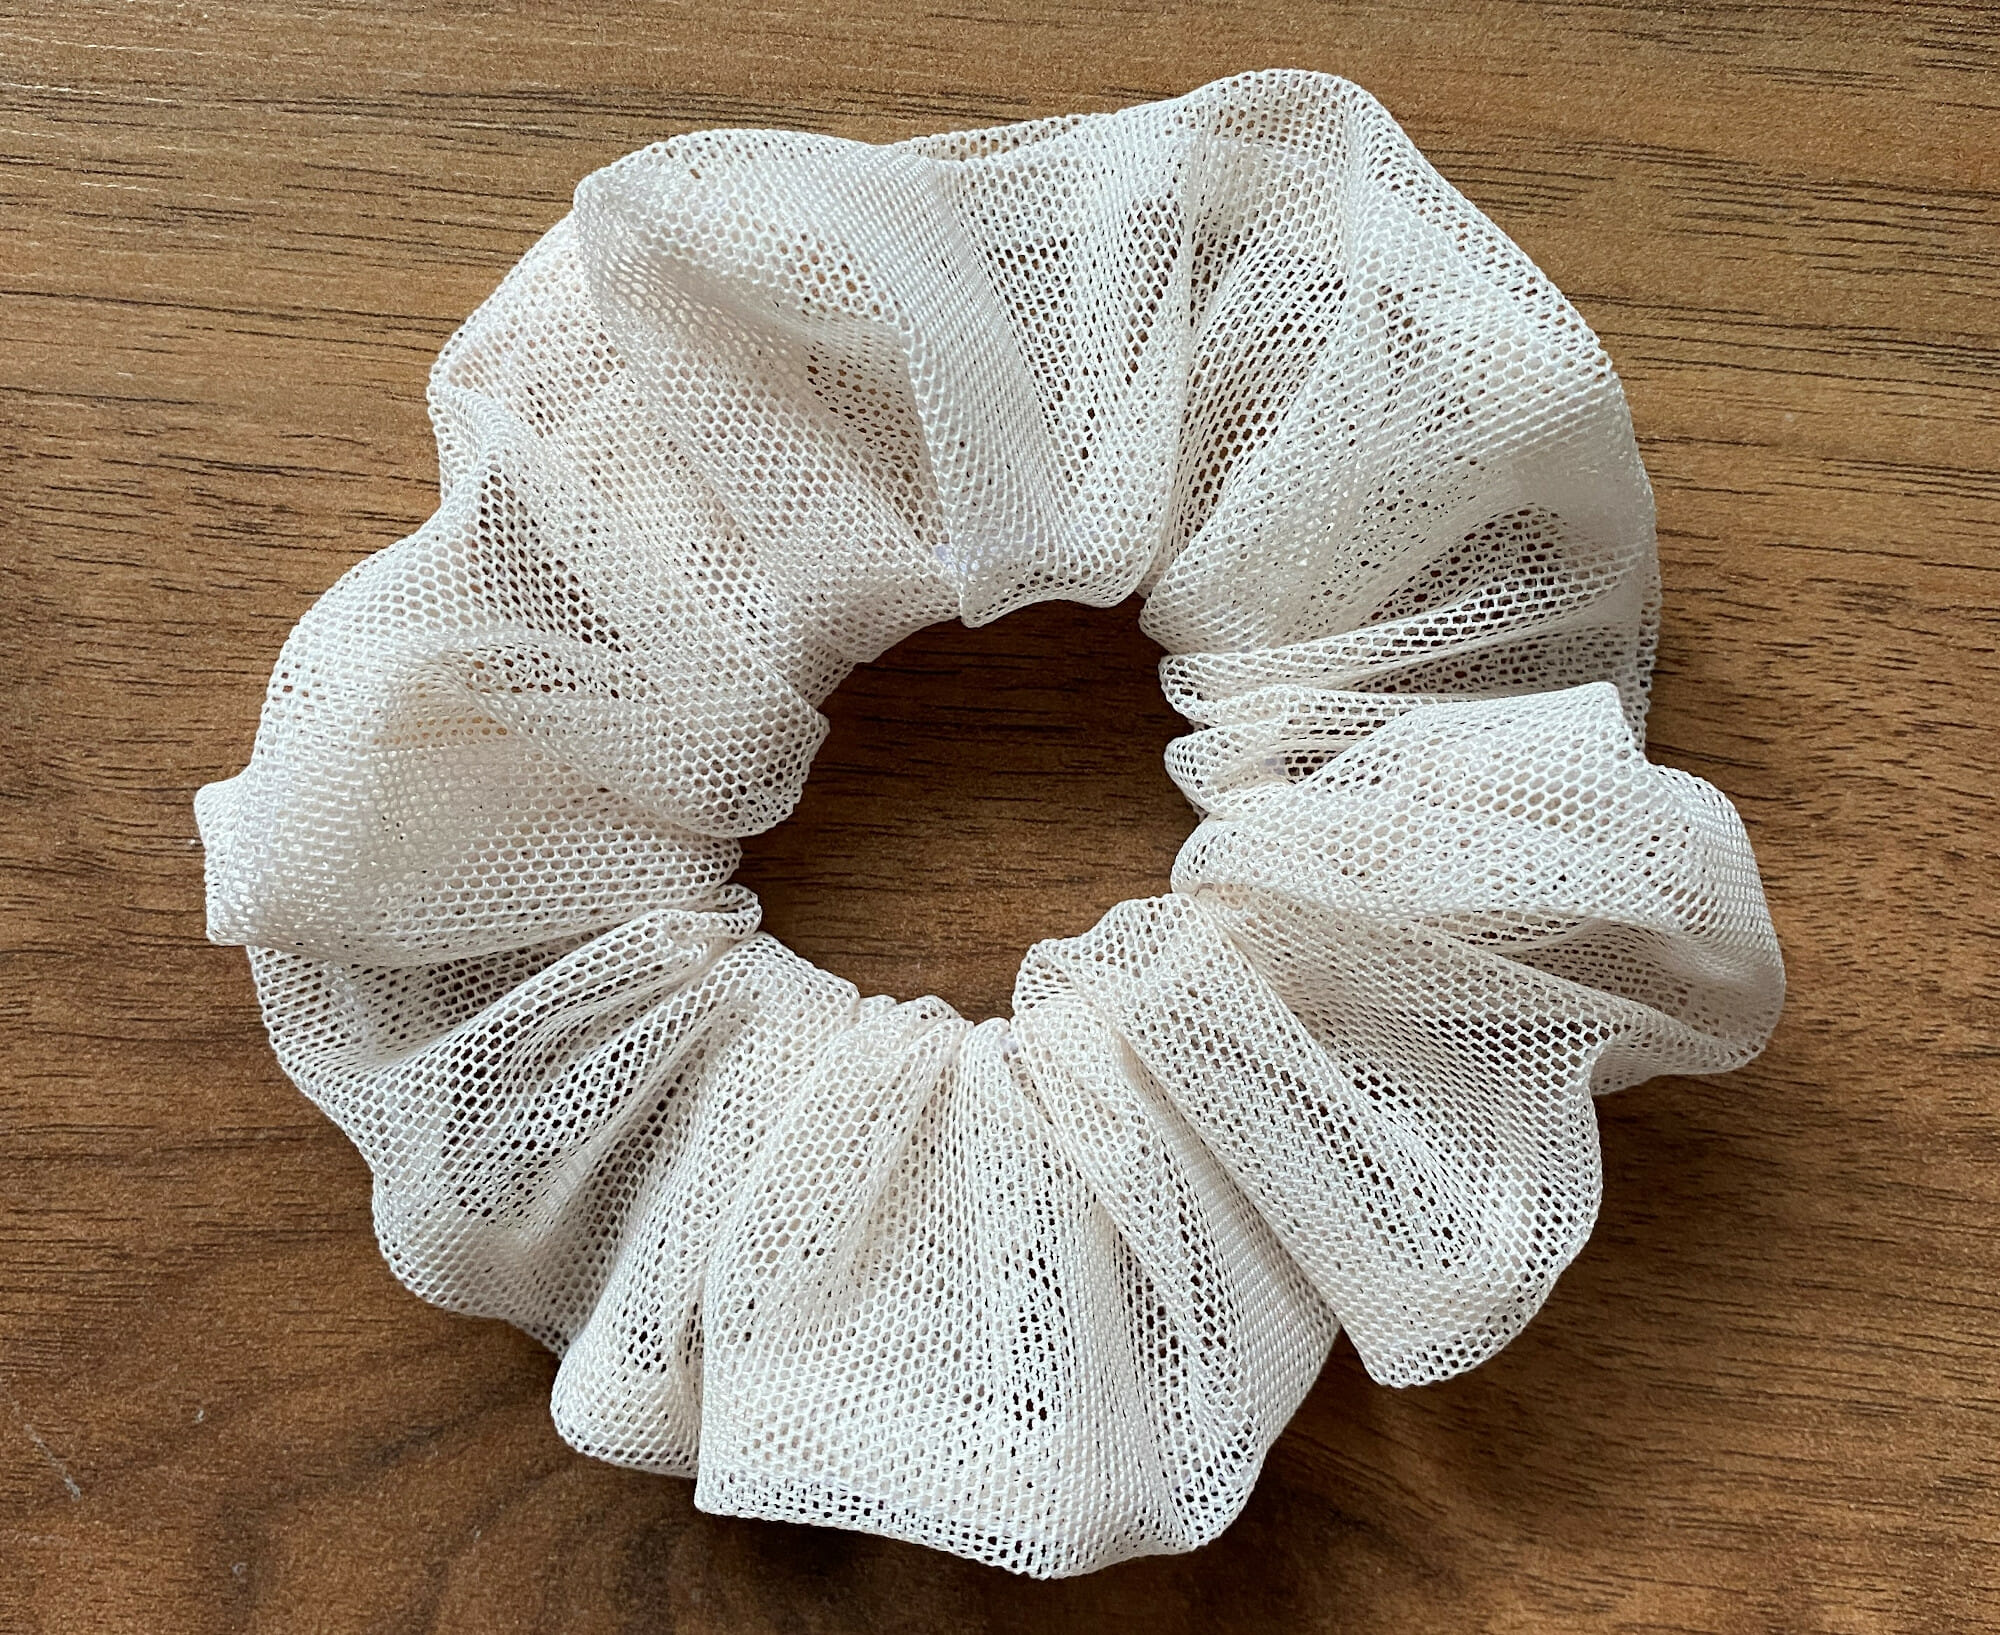
Now puff and fluff your tulle scrunchie and you are done! This is such a satisfying and quick sew, am I right?
]]>
https://www.fuzzyfabric.com/blogs/news/memorial-day-decorations-diy-ideas-for-your-celebration2022-05-25T11:04:52-07:002023-02-22T12:55:00-08:00Memorial Day decorations: DIY ideas for your celebrationMuralidharan Ramani HOLIDAY WREATHS HELP YOU TO CELEBRATE
Memorial Day comes at a great time. The weather is beautiful and summer is close by. Many people host barbecues or go for cookouts. But few take time to remember the true meaning of the day. If you want to celebrate Memorial Day wholeheartedly, display outdoor wreaths. You’ll help your friends to remember the reason for the day. Here’s how to make a wreath for Memorial Day.
1. Write numbers on the tape, cut them, and place them on the wreath’s branches. 2. After numbering the branches, separate them. 3. Gather the end of the deco mesh, place it between 2 branches on the inner ring of the wreath form and secure it with them. 4. Pull 15-20 inches of the deco mesh, make a loop, and then secure it with the next branches on the ring. 5. Repeat the process to make more loops. Attach the mesh to the inner ring and outer ring. 6. Spread out the loops to make the wreath look full. 7. Attach the burlap mesh randomly to make the wreath look fuller. 8. Pair the two types of wired ribbon and attach them to the wreath’s branches. 9. Insert the decor objects till you are happy with the way the wreath looks. Secure them to the back of the wreath.]]>
https://www.fuzzyfabric.com/blogs/news/20-summer-wreath-ideas-beautiful-hangings-for-your-front-door2022-05-13T14:19:36-07:002023-02-22T12:54:59-08:0020 Summer Wreath Ideas – Beautiful Hangings for Your Front DoorMuralidharan Ramani
Some of our favorite DIY summer wreath ideas are listed below:
Greet anyone coming to your home with a wreath made with stunning pastel-colored dried flowers. The cheerful mix of various flowers with dried leaves will make for a stunning outdoor décor idea!
2. Pom-pom Wreath
This is one of the most fun and vibrant summer outdoor wreaths ideas that you can try. Just make some multi-colored pom-poms with yarn and stick them on a circle fashioned from cardboard.
3. Crepe paper Wreath
Crepe paper offers versatility when it comes to doing DIY projects. You can make some stunning flowers and leaves in bright colors and decorate your wreath frame!
4. Seed packet Wreath
If you have loads of packets with stunning floral images, that calls for a stunning summer door decoration idea! Stick these on a frame, throw in some colorful buttons and bows, and you have a stunning wreath to flaunt!
5. Banana Leaf Wreath
Leaves fashioned from crepe paper will be used to make this fun tropical-themed wreath. Go for vibrant hues of green color to make this wreath that will lend a welcoming vibe to your front door!
ADVERTISEMENT
6. Watering Can Wreath
With an old watering can and some artificial flowers, you can transform it into a quirky and trendy wreath idea. Paint the can in a bright color and assemble the flowers in it, and you are good to go!
7. Funnel Wreath
We have just what would excite you! If you have an old funnel at home, then assemble some fresh flowers in it and hang it on your door. Keep replacing the flowers as required, and you have the perfect spring-summer wreaths!
8. Cocktail Umbrella Wreath
Looking to lend a chic summery vibe to your wreath? We have just the idea that will scream summer to the core. Use cocktail umbrellas to make a wreath. Stick these funky umbrellas on a wreath frame, and you have a groovy wreath ready!
9. Driftwood Wreath
Wondering how to put your driftwood to good use? Easy! Make a wreath out of it. Get a metal frame and stick random-sized but similar shaped pieces to make an eye-catching wreath.
10. Crochet Wreath
Your crocheting skills come in handy here. Fashion some exciting summer shapes, patterns, or anything that resonates with the season, such as watermelon and crochet on a frame in a creative way.
11. Fabric Wreath
If you have colorful fabric lying around the house, you can use it to make a beautiful fabric wreath. You can cut various textures and colors of the fabric in long strips, tie them around a wireframe, and leave the ends hanging to create a funky summer wreath!
12. Ilex Berry Wreath
Get hold of some dried ilex berries and tie them around a wooden frame. Hang it with a big ribbon for a calm and serene summer wreath option to exude an earthy vibe.
13. Rainbow Wreath
Vibrant, colorful, and pleasing to the eye; that is what rainbows denote. You can get a similar feel in a wreath too. Get hold of some faux flowers in all the shades of a rainbow and stick them on a frame. Your wreath is ready.
14. Faux flowers and Butterfly Wreath
Flowers and butterflies as a combination look utterly pleasing to the eye, so why not fashion a wreath with this mix? All you have to do is get some faux butterflies and flowers, assemble and stick them on a frame for a nature-inspired wreath.
15. Felt Succulent Wreath
Get some pastel-colored felt sheets and cut some different sizes and shapes of succulent leaves. Stick these leaves on a metal wireframe. Now you have an adorable wreath ready for your door!
16. Paper Flower Wreath
Put your art and craft skills to use by making some single-colored paper flowers, preferably in summer hues. Glue them to a cardboard frame for a perfect summertime wreath.
17. Seashell Wreath
Exuding a perfect beach vibe in sync with a summer theme, you can put your seashell collection to use by sticking various kinds and shapes of seashells randomly on any kind or shape of the frame.
18. Straw Hat Wreath
Is there an enormous hat sitting in your wardrobe that you seldom wear? If you do, stick some single or multi-toned faux flowers on a side and hang them on your door as a cool summer wreath.
19. Wooden Number or Alphabet Wreath
Stick any wooden number, for example, your house number, on a wooden frame and accentuate it by adding some faux flower arrangement to fashion a unique wreath for your front door. You can do the same with alphabets.
20. Grain Sifter Wreath
Paint and polish a grain sifter in summer colors. Use a fresh or faux flower arrangement to sit on one of its ends. Hang it with a ribbon to fashion a funky wreath.
]]>
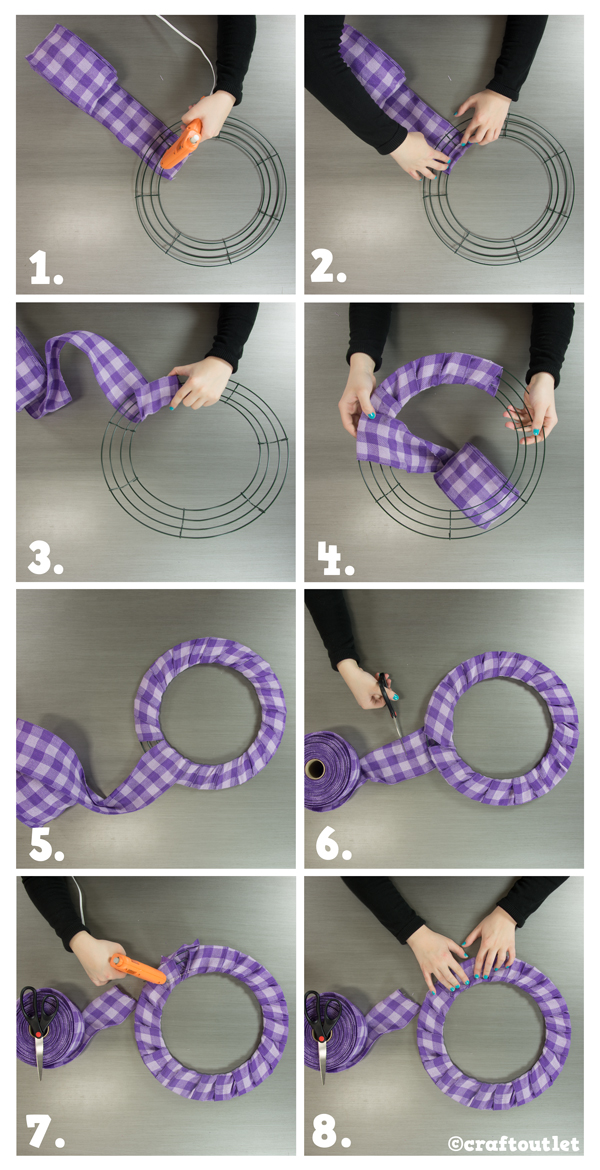
https://www.fuzzyfabric.com/blogs/news/making-ribbon-rose-wreath-ideas-tutorial2022-05-04T14:17:16-07:002023-02-22T12:54:58-08:00Making Ribbon Rose Wreath Ideas - Tutorial!Muralidharan Ramani
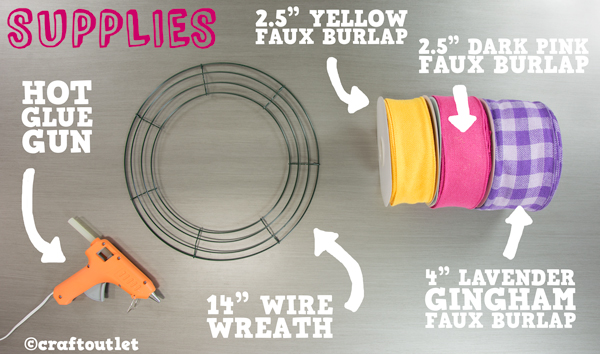
Supplies
You can buy all of the supplies in one easy step using ourWreath Recipe here.
Begin with the back of the wreath form facing up. Slide the gingham ribbon underneath the form and hot glue the end of the ribbon over the inner rung. Once cool, wrap the gingham ribbon evenly around the wreath, making sure to leave none of the wreath form exposed.
When the entire wreath form is wrapped, cut the last of the ribbon 2″ away from the form, leaving a tail. Hot glue this end onto the backside of the form. Let cool.
Next you’re going to make the rosettes. Watch the video below for an easy to follow visual demonstration of how to craft the perfect rosette in three sizes.
Small Rose (1.5″ Finished) uses about 8″ of Ribbon
Medium Rose (2.5″ Finished) Uses about 16″ of Ribbon
Large Rose (3.5″ Finished) Uses about 32″ of Ribbon
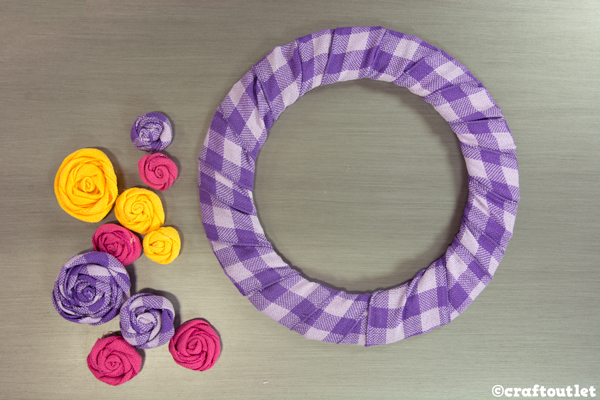
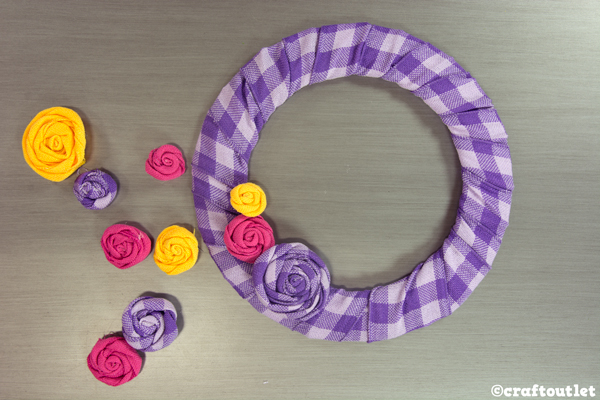
For our next step, it’s helpful to begin with a cache of rosettes made in every size and color. This will come in handy once you begin to place them onto the wreath form as you want to maintain a great variety of size and color on your wreath.
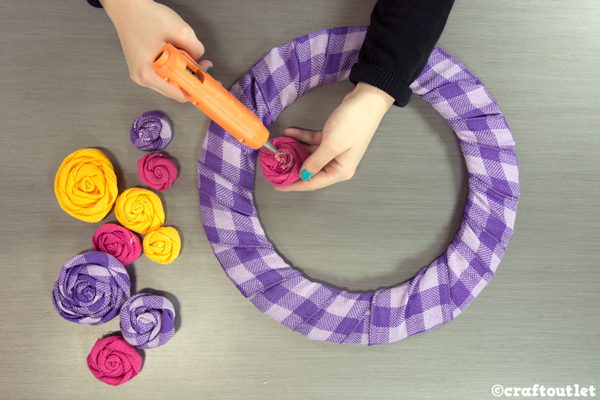
To attach the roses, simply dab some hot glue on the back and place wherever you see fit on the wreath.
Glue the roses in clusters, trying to vary the sizes and colors as much as possible. If hot gluing first seems intimidating, you can always pin each rosette to get a preview of what your finished product will look like. Once happy, remove pins one rosette at a time and hot glue the rosette for a permanent placement.
Now completed, your Ribbon Rose Wreath is ready to be shown off. If you’re wanting to choose your own ribbons for this technique, we suggestfaux burlap ribbons. It has a large selection of color and printed faux burlap to help make finding the right ribbon to suit your taste easy. Keep in mind, the wider the ribbon is, the thicker the rose will be. We love this wreath as is, but don’t be afraid to add anyspring accent piecesyou like!
]]>
https://www.fuzzyfabric.com/blogs/news/easy-tulle-spring-flowers-door-decoration-ideas2022-04-25T13:48:05-07:002023-02-22T12:54:58-08:00Easy Tulle Spring Flowers Door Decoration IdeasMuralidharan RamaniGet ready forSpringby making this cute Tulle Spring Flowers decoration for your front door.
I love how the flowers came out but I have to admit, I had quite the sparkle mess to clean up afterward. If you’re not up for that kind of mess buy tulle without sparkles.
This bright spring decoration add the pop of color to my front door that I was looking for and all of the supplies came from the Dollar Store except the fabric.
It took a little bit of time to figure out the right leaf sizes and best techniques to use. So you don’t have to spend your time fussing with that, I’ve provided step-by-step instructions and a pattern for the leaves and flower centers below in the supplies list.
Supplies You’ll Need:
A Dollar Tree plastic charger or plate (I used a silver charger plate)
Cut tulle 7-inches long for the 3 smaller flowers. Cut tulle 9-inches long for 2 larger flowers. I used one roll of tulle per flower.
To tie the tulle onto the ring by folding a piece in half and placing under the ring.
Pull the ends through the loop end.
Make a tight knot to finish.
How to Make the Leaves and Flower Centers:
Above shows the backs of the leaves and flower center.
How To Make The Leaves And Flower Centers In More Detail:
Make 4 large leaves and 6 or so smaller ones (enough to cover your plate). Trace the Leaf Pattern onto a lightweight cardboard and cut out. Next cut fabric 1/4-inch larger than the cardboard. Cut notches into the fabric and use tacky craft glue to glue the fabric to the back of the cardboard.
Making the Flower Centers is the same process as the leaves but glue a ball of poly-fil stuffing (batting) to the center of the flower to give it a little dimension.
Putting It All Together:
To finish, hot glue the centers onto the flowers, then hot glue the leaves and flowers to the plate. Hang with command strips or drill a small hole at the top of the plate and threaded with twine.
Hot glue the centers to the flowers and arrange and glue everything to the plate.
If you love this Spring Craft,Pin-Itto share! Then check out more at FuzzyFabric.com
]]>
https://www.fuzzyfabric.com/blogs/news/spring-wreath-ideas-to-brighten-up-your-front-door2022-04-08T13:10:24-07:002023-02-22T12:54:57-08:00Spring Wreath Ideas to Brighten Up Your Front DoorMuralidharan RamaniSpring wreath ideas are delightful because you can place display them from late February and into the warm seasonal months if you’d like. Occasionally, all your home desires are a little elaboration to come alive. If you’re looking for somewhat that’s informal to make and is also easy on the pocket, you can try this festive geo mesh tutorial.
Since its beginning, deco mesh has been enchanting the design world by storm! It is used by designers and florists to complement life and hue to seats and crafts. This year, get crafty and create your own wreath that will be the greed of all who see it. Below, I’m going to share a step-by-step guide for making a beautiful spring wreath.
Start by putting the stems on the wreath using the floral pins. After that, cover the upper side of the wreath with the help of stems. Since you are going to use light-colored geo mesh, the wreath frame will be effortlessly seen if you don’t shelter it properly.
Step 2:
By starting on one end of a stem, you should gather the geo mesh and pin it properly. After that, tuck the ends of the mesh to confirm there are no strings hanging.
Step 3:
Now, start to gather about 8-10 inches of your deco mesh for making a loop, and then secure it using a pin. If you want a bigger loop, you will need to gather more inches. And if you want a smaller one, gather fewer inches.
Step 4:
You should continue to make loops until you cover the entire wreath with the deco mesh fabric.
Step 5:
In this step, pin one edge of the ribbon to the back of the wreath and roll it around the frame.
Step 6:
After that, attach the ornaments and trimmings to the wreath using the hot glue gun.
Step 7:
Now, you can hang your wreath on your front door, wall, or fireplace.
The inordinate thing about this deco mesh wreath is that it can be used to beautify any space. You can use it to elegant your fireplace, doorway, and mantel, this spring with beautiful hues you select to match your home. Use it in any place that needs perking up. Its material is sturdy and water-resistant so it can be used inside or outside. Though, ensure you don’t place the wreath in direct sunshine or it will start declining after a while. You can create the wreath any time of year and use dissimilar decorations.
]]>
https://www.fuzzyfabric.com/blogs/news/birthday-party-tulle-tutu-table-skirt-decorations-for-baby-shower2022-04-01T09:30:58-07:002023-02-22T12:54:56-08:00Birthday Party Tulle Tutu Table Skirt Decorations for Baby ShowerMuralidharan RamaniTulle Fabric Bolts / Tutu's
Table skirt size: 6FT colorful tulle table skirt refers to the length of the table skirt, not the table.6ft (L72in×H30in) table skirt: 1.can covers front and one side of a 4ft rectangle table 2.can only covers front of a 6ft rectangle table.Please measure your table size to decide which size you need and carefully look Left side size detail image, before you buy it.
Material: The pink anti-wrinkle lining cloth is matched with soft and comfortable yellow, blue, purple and dark pink spliced tulle, color bright and colorful.Washable, natural drooping,wrinkle resistant,durable.Can be reused.Avoid sharp items or the tulle table skirt may be damaged.
Easy Install: The unicorn tutu table skirt sewn with loop under the top edge, and the package include hook with back adhesive. Stick the hook on the table and put the table skirt top edge right on the hook, the hook and loop stick together, done!
Wide range of use: Colorful rainbow table skirt perfect for rectangle table, round table, unicorn table cloths for parties, unicorn table decorations for girls birthday, candy party, cake party, dessert party table decorations, baby shower decorations for girls, gender reveal, birthday party, baby 1st birthday party, wedding, holiday parties, etc.
Easy care:If you want it more soft and fluffy, just put it in the water, hang it out to dry, after use. After use, you can put it directly into the packaging bag and use it next time. If there are stains, you can wash it by hand, and you can continue to use it next time after drying.
]]>
https://www.fuzzyfabric.com/blogs/news/creating-a-holiday-festive-ribbons-swag-and-bow2022-03-25T10:35:15-07:002023-02-22T12:54:55-08:00Creating a Holiday Festive Ribbons Swag and BowMuralidharan Ramani Supplies (for swag) You can buy all of the supplies in one easy step using our Wreath Recipe™ here.
How do you make this DIY tutu Easter basket? Step 1: Gather your supplies. Easter Basket Pink Tulle - click 1″ Grosgrain Ribbon Hot Glue Gun Scissors
Step 2: Make the Easter Basket tutu. Before cutting your ribbonto make the tutu, wrap it around the basket top to see how long you need it to be. Give yourself enough room to tie it into a bow at the back of the basket to attach it as well.
Cut strips of tulle (you can often find these rolls at the dollar store) to be about 12″ long. Cut several, you’ll need a lot to make it full.
Tie the tulle onto the ribbon you cut in a slip knot, like shown. You don’t need to pull it super tight.
When your tutu is finished, tie it onto your Tutu Easter Basket!
After Easter, your little one can wear the tutu herself! It’s super cute and is a great way to make use of something you’d normally only use once a year!
]]>
https://www.fuzzyfabric.com/blogs/news/white-tulle-wedding-decorations-dress-skirt-backdrop-gown2022-03-15T09:18:12-07:002023-02-22T12:54:54-08:00White Tulle Wedding Decorations Dress, Skirt, Backdrop, GownMuralidharan Ramani
Delightful Ideas Of Using Tulle At Your Wedding
Ceremonies held in religious buildings may not need excessive decoration. Other indoor locations, like banquet halls, may need decorations brought in, and outdoor locations might need to hide a few weather-related flaws. Tulle is an affordable choice for all of these applications.
Cover the altar area or table at the front of the ceremony with tulle. Tulle can also be used to cover altar flower arrangement and weaved through candelabras at the front of the church. Tulle wedding bows can also be added to the ends of each pew or chair, with or without flowers or candles.
Banisters, Stairs, and Railings
While the altar area or front of the ceremony and seating are common places to add tulle, you can incorporate them in other areas of the ceremony. Hang small white wedding lights in gathered tulle swags above doors and windows. Balcony railings, both inside and out, can have tulle wound around posts. Decorating banisters with tulle is easily done and allows the bride to make a grand entrance.
Entrances and Archways
Hang tulle from the ceiling at entrances to indoor ceremonies. At outdoor ceremonies, it's common to have canopies or bridal arches; use tulle to decorate the posts, adding flowers, poms, and greenery to enhance the design.
Outdoor Ceremony Tulle Uses
Outdoor wedding ceremonies might benefit from tulle use as well.
Tie bows around chair backs to dress up plain rentals. Colored tulle on white or black chairs can be striking. Walking paths can be marked off by using tulle as a delicate fence. Wrap tulle around posts and columns to help camouflage flaws for gazebo decorations. Outdoor structures without a ceiling can utilize swagged tulle as part of the decorations.
Reception Decorations With Tulle
Wedding receptions held in large halls, banquet centers or convention centers often require a lot of decorations. Tulle is a practical way to transform the site into your dream wedding reception without adding massive materials or labor costs. Match the ceremony décor to the reception décor. If you had swags at your ceremony, use swags across the front of your cake table and head table. Wrap tulle around doorways and banisters using the same techniques as you did at the ceremony. This creates a unified look for all your wedding festivities.
Tulle Backdrops and Walls
Not every wedding reception location has beautiful walls to surround your festivities. If this is the case, you'll want to add tulle to walls and create tulle wedding backdrops behind the head table. Mix tulle with satin and other fabrics for a fresh look. White, gray, black, tan, and navy make excellent neutral backgrounds that showcase colorful linens, flowers, and other decorations.
Swagged Tulle
Creating dramatic swags with tulle can help separate spaces at an indoor or outdoor reception. Use white for a light and airy look, or darker colors for a dramatic effect that separates areas even further. Include lights with the tulle for ambiance; accomplish this using strands, hanging fixtures, or paper lanterns.
Chair and Table Decor
Add tulle to your table decor. Tulle makes a quick and easy runner or overlay on table linens. Use the same color to wrap around chair backs and tie in a knot or bow. If desired, you could nestle battery-operated candle or floral centerpieces in a cloud of tulle.]]>
https://www.fuzzyfabric.com/blogs/news/first-birthday-party-no-sew-high-chair-tutu-supplies-diy-steps2022-03-10T08:44:38-08:002023-02-22T12:54:53-08:00First Birthday Party No-Sew High Chair Tutu Supplies DIY StepsMuralidharan Ramani
Before you roll up your sleeves and get to work, make sure to grab all the supplies you’ll need. This will help you be prepared, and you won’t have to run around the house looking for things last minute.
Elastic band ½″ to 1″ thick and long enough to fit around the highchair
Sticky velcro squares to stick to the highchair on the outside of the tray (Two-sided tape will also work in a pinch if you can’t find any velcro)
Decorative ribbon, which is optional for the outside of the tutu but will add some real flair
Scissors to cut everything down to size (Think about using ones that create decorative edging, to make your tutu look even more special!)
First Birthday Party High Chair Tutu DIY Steps:
DIY’s are such a fun way to stay busy, and the pleasure is even greater when you do it for your kids. If this is your first time making a tutu, remember to be organized and prepare beforehand all the things that I listed above.
It will probably take you less than two hours to complete this project, meaning it’s a great weekend activity. And without further ado, I present to you the simple tutorial on how to make a high chair tutu step by step:
Take a piece of tulle and fold it in half. You’ll need to make sure the tulle is the final length that you want when it’s folded. If you are in doubt, always cut a longer piece than you need. It’s much easier to cut off any extra later than to have to start all over again!
Hold the fold of the tulle above the elastic with the elastic over the tulle.
Loop the longer piece of tulle over the elastic and through the fold of the tulle.
Pull the longer piece of tulle tightly through the loop.
The loop should be pulled tight to the elastic and what is seen around the outside of the highchair tray once it is attached.
Starting at one end, place the sticky velcro squares around the outside of the highchair and match them up with the inside of the tutu. It should fit flush against the highchair when you are finished.
The tutu will need to be tied in the back once the birthday girl is placed in the seat, so that first birthday party pictures can be taken.
Think outside of the box and get creative with bows, stick-on jewels, or any other fun pieces that strike your fancy.
Seriously, that’s it! Even if this is your first time getting crafty, learning how to make a no-sew highchair tutu couldn’t be easier, so it is a perfect first-time project. If your daughter is like mine, she will want to wear it around the house afterward for sure, but once she outgrows it, wouldn’t that make the perfect addition to your memory box?
Other Fun DIY Tutu Ideas
I created the tutu by using the same steps as my Infant Tutu. I routinely use the tutu tutorial to create tutus for Halloween costumes or just as tutus for dance. I think tutus are just part of the territory when having a daughter, and the only limit to what you can do with them is your imagination.
Highchair vs Skirt Tutu
The biggest difference between the DIYhigh chair tutu and the skirt tutu is that you need to keep the elastic long enough to wrap around the high chair. I was able to simply tie it behind the chair that the highchair sits on. Depending upon your highchair, you might need to cut your elastic longer, and unless you can get your daughter into the highchair without removing the tray, you won’t be able to tie it until she is in the highchair. The tutu only took me about an hour and a half to make, and the pictures were well worth the effort.
I made my first highchair tutu for Riley’s second birthday because, for her first birthday party, I forgot the highchair altogether. We have pictures of her eating cake out of my hand. It was a first-time mom mistake for sure.
For her second birthday party, I made up for it, though. I placed the ribbon around the outside of the tutu and it ended up dipping around the outside of the tray. I could have tried to hot glue the ribbon to the outside of the tutu, but I wanted Riley to be able to wear it as a tutu afterward. She totally does, too! Most people assume that the tutu will get covered in cake, but neither one of ours did. Most of the time, she wears it over her jeans! Love that girl!
First Birthday Party Tips For Success
The first birthday party is more about amusing the other kids who are attending than about amusing your one-year-old.
When creating the menu, keep your grownup guests in mind and just make a large dish of kid-friendly food like mac-n-cheese or chicken fingers.
Collages with 12 pictures, with each picture representing a month of your child’s life with milestones like the first tooth, first time crawling, standing, or eating solid foods are great milestones to track.
Get the guests involved by having them write a note to the first birthday girl or boy, to open on their eighteenth birthday. This is especially important for grandparents and great-grandparents who may not be there to celebrate that birthday.
Think about creating a smash cake for your first birthday girl. It will make the other children attending less crazy about getting their slice of cake and much easier for first birthday party pictures. And don’t worry if anything gets on your high chair skirt DIY project.
Have your highchair tutu attached to the outside of the tray so that all you need to do is pop the tray onto the highchair.
Place the highchair in a spot with a visually pleasing or blank background so that the focus during the first birthday party pictures is on the birthday girl and not on the background!
Since you already have the tulle and the ribbon, why not go all out and make a whole theme around it? I tend to think a princess theme would fit right in, but you could also create an entire fairy wonderland!
To make it even more fun, have all the guests (adults included), dress up as part of the theme you have chosen. Don’t worry if you have any boys on your guest list—they can always become little kings or princes.
Your little girl is probably not going to remember this first birthday party, so it is super important to capture as many moments as you can in pictures. Just think of the stories you will be able to tell her a few years from now!
For Avery’s Fairy First Birthday party I decided not to go with a ribbon around the outside. Since the decor consisted of Tulle Pom Poms, it only seemed natural to leave the tulle exposed. I loved how well it matched the Fairy Magic Wands.
FAQs
Do I Need To Use A Certain Type Of Tulle?
Tulle can be made from both natural and synthetic fibers. But let’s be real: She will lose interest in the tutu before long, so there is no reason to buy the most expensive stuff you can find. Nylon tulle is found practically everywhere, and there is no high price tag to go with it.
What Are The Best Colors Of Tulle To Use?
The colors that you choose are completely up to you, but it is worth noting that lighter colors are easier to see through. You may need to use several more layers of tulle to get the coverage that you want. For example, white may need 10 layers to really make it pop, while something like red only needs two or three layers. The darker you go, the less material you will need.
Will The DIY High Chair Tutu Be Washable?
Yes, you will be able to wash the tutu if she gets it dirty. There are two ways you can do this: either by hand or in your washing machine.
You can only use the washing machine option if it has a setting like “delicate,” “wool,” or “hand wash,” and you can use a warm temperature setting. Follow the instructions for your particular machine, but keep in mind that tulle should never be washed in water over 30 degrees.
The easiest way to hand wash your tutu is by filling up a sink or bucket with warm water and a small amount of liquid detergent. If you use too much soap, you will spend forever trying to rinse the suds out of the tutu.
Gently swish it around in the water and let it soak for a couple of hours. Rinse it out under running water and gently squeeze out the excess. All you need to do next is hang it to dry and you are ready to use it again.
It’s now up to you to create the perfect first birthday party highchair tutu. The materials are easily found online or at your local craft store, and the instructions are easy to follow. Anyone can put this together, and I would love to see some pictures of what you manage to come up with!
Can I Make The Tutu For Other Chairs?
Yes, you absolutely can. This is such a versatile idea that you can adapt to your own scenario. Your daughter doesn’t even have to be the one who’s obsessed with tutus. I’m an adult and I still can’t get over how adorable this piece is.
I love the idea so much that I might even consider pulling off a Carrie Bradshaw and making myself one.
Just measure the chair or table you have and follow the instructions. That way, it can be great for any chair, any holiday, and any table you can think of.
Can I Repurpose The Tutu?
Once everyone’s had their fair share of fun with the tutu, it’s time to find the fabric a new role. Tulle is a very versatile material that you can repurpose easily.
Think of cute little tulle pom-poms for a themed party, for Halloween crafts, Christmas decorations and ornaments, as packing material for gifts, a tulle wreath, and so on. Finding a new purpose for fabrics will not only boost your creativity but will also reduce waste, which is always a great thing.
Conclusion
Now that you know how to make a tulle high chair skirt, it’s time to go online and start shopping. This little DIY project can be such a unique bonding experience for you and your little one. She can help you pick a color and decorate the tutu, and it will be her favorite thing to put on.
If you have an at-home birthday party coming up, or have extra time on your hands, this seems like an amazing idea and way to get creative. It won’t break the budget, either, it’s so simple to make, plus it takes only an hour and a half or so. The pictures that you’ll take of the tutu will inspire all your friends to take up a new DIY task themselves.
]]>
https://www.fuzzyfabric.com/blogs/news/how-to-make-a-craft-ribbons-project-back-to-school-offray-ribbons2022-03-07T09:04:37-08:002023-02-22T12:55:14-08:00How to Make a Craft Ribbons Project? Back to School | Offray RibbonsMuralidharan RamaniRibbons are one of the top and most popular craft materials that can be used in a wide range of craft projects. Apart from making ribbon flowers, embroidery, bows, and sashes, you can also make an end of school awards for kids. This is one of the best ends of the school year actions that the kiddos are going to love.
Make a fun award using ribbons that doubles as a fun memento for the school year. It is ideal to find an online wedding and craft product supplier for buying burlap ribbon, tulle fabric, deco mesh, lace fabric, chair cover, tablecloth, and many others. Below, I’m going to share step by step guide for making your own award.
Take your favorite ribbons for making this project. You can also take 2 sheets of dissimilar patterns and the sheets are double sides offering even more choices for the award ribbons.
Step 2:
After that, you will need to choose 2 sheets of matching paper and cut them into four 2-inches wide strips. Fold every ½-inch along the length of the strips and then fold into an accordion.
Step 3:
Now, start to attach the accordion pieces and end using dry adhesive. After connecting all four pieces, you should bring the beginning and end together with the adhesive for making an accordion circle.
Step 4:
In this step, pull the top off the accordion circle down to the work surface for creating a pinwheel.
Step 5:
With the excess ribbons from cutting the strips for the pinwheel, cut out (or punch out if you have the suitable punches) two 3 ½-inches circles. Grasp the pinwheel flat and sensibly add hot glue around the midpoint.
Although glue is still hot, you can center one of the circles on the pinwheel. You should hold them in place for a few seconds though glue cools. Flip over and reappearance on the back of the pinwheel.
Step 6:
You will need to cut out a 2-inch circle in the white cardstock. Use dry glue for attaching the circle to the front of the prize ribbon.
Step 7:
Now, cut out a 1×1/2-inches rectangle using the leftovers from making the pinwheel. You can use dry adhesive for attaching the pin back to the back of the pinwheel. You should cover the pin with the rectangle you just cut out, once more using dry gum.
Step 8:
For making the ribbons for the award, cut two 1 ½-inches strips from a new portion of the ribbon. And then trim the ends to aspects like ribbons (tip: use a punch for the perfect shaped ends! this is a 1-inch square punch.) You can attach the ribbons to the back of the pinwheel using dry gum.
Step 9:
At last, write the name of each award on the ribbons and, when the kids select the winners, add their names to the white cardstock sphere.
By following the above-mentioned steps, you can make end-of-school award ribbons. You can find one of the prominent wedding and craft product suppliers for buying tulle fabrics, cheap deco mesh rolls, lace fabrics, favor bags, and many others at economical prices.
]]>
https://www.fuzzyfabric.com/blogs/news/spring-deco-mesh-wreath-ideas2022-03-01T08:21:03-08:002023-02-22T12:55:16-08:00Spring Deco Mesh Wreath IdeasMuralidharan Ramani
How To Make A Spring Deco Mesh Wreath
I love making wreaths with deco mesh! They have so much movement and volume that they look impressive and really stand out on someone’s front door.
The secret that only wreath makers know is that deco mesh wreaths are actually incredibly easy to create. In fact, I made a show-stopping spring welcome wreath with deco mesh, and it took me less than an hour.
As you continue to practice and make more wreaths out of deco mesh, you will learn habits and processes that will speed up your time too.
My favorite thing about this wreath is how perfectly all the layers look together. Since the welcome sign in the middle has a lavender font, I used that same color mesh throughout the greenery.
There is also a lot of room for customization and creativity! Attach a hand-tied multi ribbon bow to the wreath, use the bow instead of the sign, or use them both. It’s all up to you, and I’m happy to show you how to make it both ways.
Supplies
Wire Wreath Forms / Frame - click 10-inch or 21 inch Poly-Mesh - click Ribbons - click Staple Gun
Attach The Mesh To The Wreath Frame
Begin by securing the deco mesh to the inner frame of the work wreath. Use the twist ties to hold it.
Then, create 10-inch loops in between each twist tie, securing and twisting the mesh to the frame as you work your way around it.
Do this all the way around the inner wreath frame.
When you are finished, go back and “poof out” the mesh loops you attached to the frame. They should be super poufy and have lots of volume.
Loop Mesh Around The Outer Ring
Without cutting the mesh, continue to add 10-inch loops to the twist ties around the outer ring. It is the same exact process as before.
Make the same 10-inch-long loops and use the needle ties to attach them to the wreath frame.
After you tie the mesh to the last twist tie, trim the mesh from the bolt and hide the tail inside the wreath.
Attach Ribbon Streamers
Now you are ready to attach the ribbon streams to the wreath. I used 13-inch long ribbon streamers in various green and lavender patterns that go with the same lavender shade as the deco mesh.
Layer a thinner ribbon on top of the wider ribbon, fold them in half, pinch them in the middle, and add them to the wreath. Twist the ties around the middle of the streamers until they are nice and secure.
Then, pull the streamers apart, so they aren’t laying directly on top of each other anymore.Adding ribbon to deco mesh wreathsadds so much color and texture – don’t you think?
Add Greenery And Flowers (Optional)
For this step, I suggesthanging the wreath on a wreath easelor door so that you can see where you want to place the flower picks.
Choose your favorite greenery and floral that match the colors in your mesh, ribbons, and sign.
Depending on how big you want your wreath to be, trim them pretty short so that they don’t stick out too much from the wreath.
Go around the outer edge of the wreath, and then keep adding greenery and floral until you work your way to the inside of the wreath.
Make A Hand-Tied Bow
At this point, you can stop and call the project finished. Or, you can make a hand-tied bow and add it as a second focal point. Have as much fun and be as creative as you want.
]]>
https://www.fuzzyfabric.com/blogs/news/how-to-make-a-wreath-with-mesh-ribbon-and-burlap2022-02-24T09:30:00-08:002023-02-22T12:55:15-08:00How to make a wreath with mesh ribbon and burlap?Muralidharan Ramani
Christmas is celebrated across the globe to mark the birth of Jesus Christ. People celebrate the festival with jingle bells, Santa Clara sharing gifts, prayers in a church, decorated items hanging in a house. December is a month of paradise, people would love to celebrate Christmas in a house with homemade chocolates, cakes, wines. They make the Christmas hut themselves with decorated Christmas trees with a ribbon draping, lighting, mesh topper.
Decorating their homes with the hangings in a house to a door, window craftworks. Before decorating your Christmas tree, read the last blog ( steps for making a Christmas tree) that would be helpful to you.
In this blog, let us see how to craft wreaths with ribbons. It's usual to make a wreath with flowers, leaves, deco mesh.
Requirements:
18-inch wreath wireframe Zip Tie Assorted Christmas ribbons Scissor
Take an 18-inch wreath wireframe and combine 3 to 4 combinations of Christmas ribbon one behind another. Arrange the ribbons based on the theme of your decoration. If your theme is Halloween then choose Halloween ribbons. Now, we took 4 Christmas-themed ribbons and make them as a loop circle. Tie the end of the one-sided ribbons loosely with the help of a zip tie. Don't tight the zip-tie.
Step-2:
Calculate the distance of the loop circle and continue making the loop until the end of the circle or wireframe is filled with ribbon. After completing the circle, leave the remaining ribbons for making a tail. Make a big loop and tie the ribbon using a zip tie and cut the big loop in half at the angle. Trim all another big loop at the half-angle.
Step-3:
Pull the zip tie towards the backside of the wireframe and tight the tie as much as you can. Cut the end off of the zip tie using a scissor. Start separating the ribbon loop with the bare hand. Try to alter the designs, color of the loop to look more attractive.
Step-4:
Also, separate the tail of the ribbon. Now, you can hang this handcrafted, homemade ribbon wreath using ribbon ormeshat your door, front door for welcoming the guest to the Christmas celebration or party.
Choose our Fuzzyfabric.com online store for quality mesh, ribbons, tulle fabric, tablecloths, chair covers, organza bags, Wreath wireframe at a wholesale factory price.


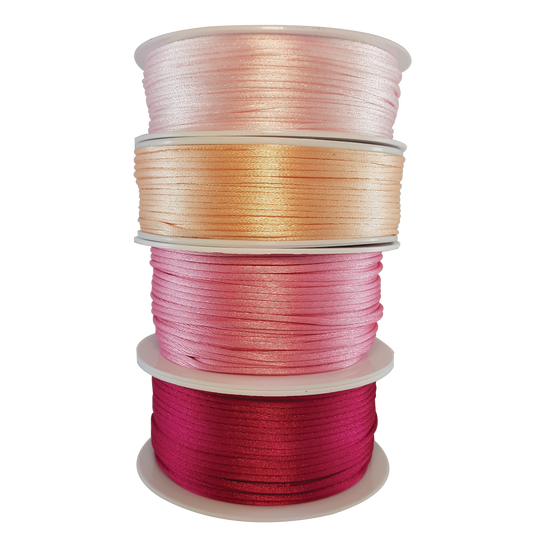


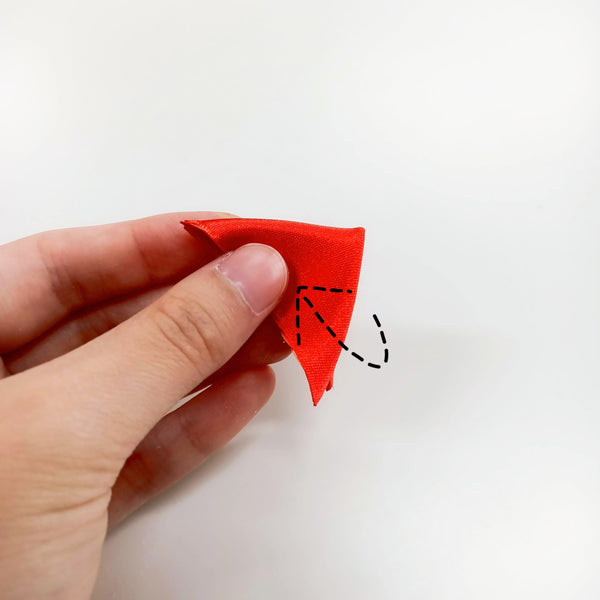


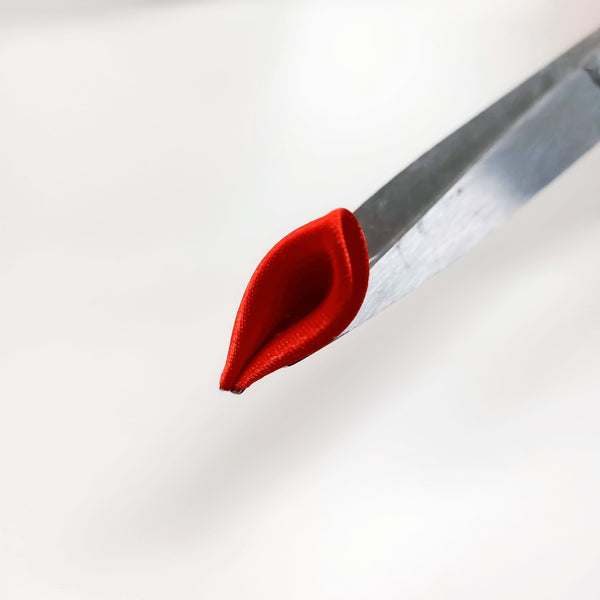


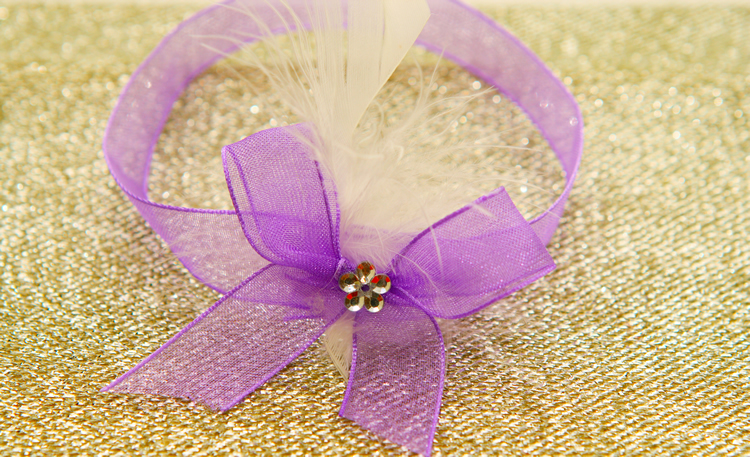

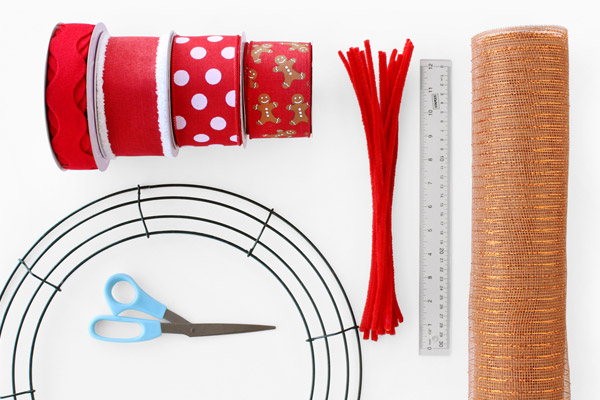
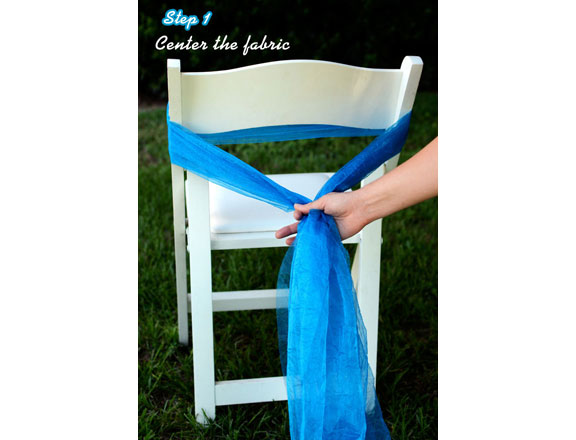
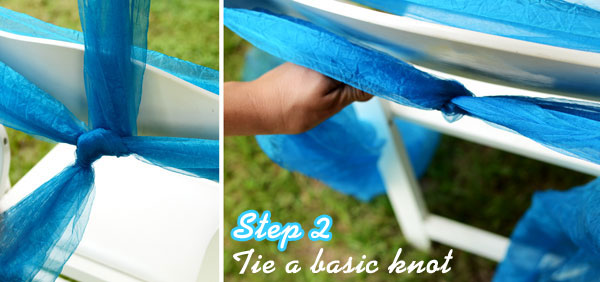
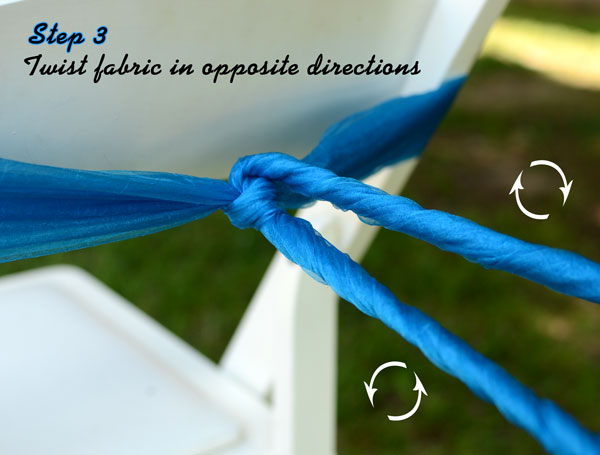

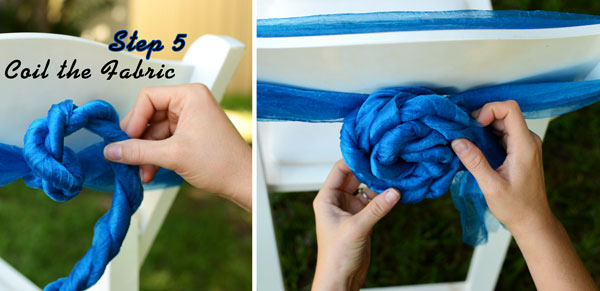
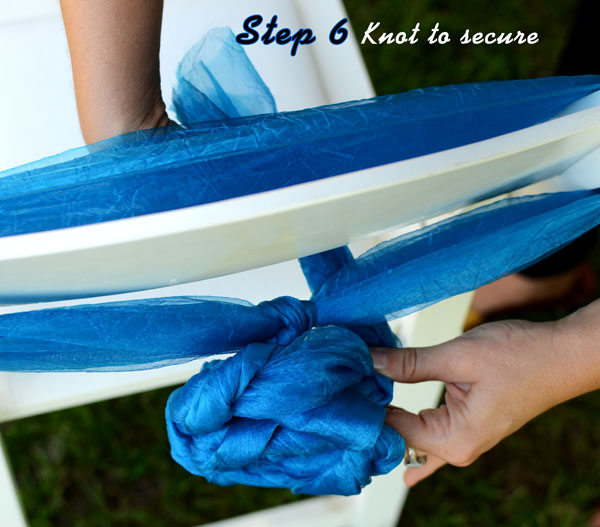
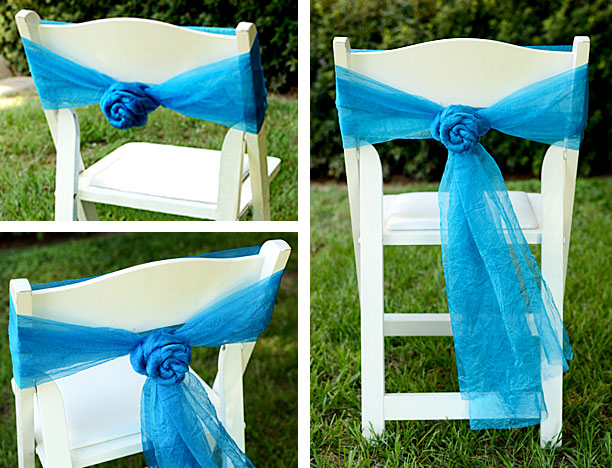


:max_bytes(150000):strip_icc():format(webp)/Slide_8_-_Accessorize-5a9e020f3128340037d59c98.jpg)
:max_bytes(150000):strip_icc():format(webp)/IntroSlide-5a46d9f6845b340037f70423-2-5a62619322fa3a0037690067-5a65f5cd7bb28300374d885b.jpg)
:max_bytes(150000):strip_icc():format(webp)/RibbonBouquet-596e8026d963ac0010eab574.jpg)
:max_bytes(150000):strip_icc():format(webp)/valentineribbonhairbow-5a03d44abeba33001a5ee918.jpg)
:max_bytes(150000):strip_icc():format(webp)/ribbonchandelieratShabbyfufu-5a03d5f2e258f800374833a6.jpg)
:max_bytes(150000):strip_icc():format(webp)/ribbon-wall-hanging-1-5a03cfd24e4f7d001a5dbb4c.jpg)
:max_bytes(150000):strip_icc():format(webp)/ChristmasRibbonStar-5a03d98e4e4f7d001a600d0f.jpg)
:max_bytes(150000):strip_icc():format(webp)/sunflower-burlap-ribbon-center-front-door-blog-post-5a03daa3ec2f64003752950b.jpg)